# Install n8n locally using Cloudflare
> Learn to install n8n locally with Docker and Cloudflare Tunnel. Includes PostgreSQL setup and Zero Trust security for home lab deployment.
- Canonical: https://www.russ.cloud/2025/10/04/install-n8n-locally-using-cloudflare/
- Published: 2025-10-04
- Author: Russ McKendrick
- Tags: AI, Automation
---
I finally got around to getting a small AMD Ryzen 7 Mini PC with 32GB of RAM to use as part of my home lab to replace some aging Raspberry Pis.
While it came with Windows 11 (which i am sure was fine and not dodgy in any way) I instead opted to run the server version of Ubuntu 24.04 LTS and immediately trashed the Windows install. Given everyone is making videos about running [n8n](https://n8n.io/) on VPS servers I decided to do the same and run it locally on my new machine.
## Installing Docker
As I was running a fresh Ubuntu 24.04 install I needed to install Docker before I could run n8n locally, To do this I first needed to install the prerequisites and then setup the official Docker repository:
```bash frame="terminal" title="Installing the prerequisites and setting up the Docker repository"
sudo apt update
sudo apt install apt-transport-https ca-certificates curl software-properties-common -y
curl -fsSL https://download.docker.com/linux/ubuntu/gpg | sudo gpg --dearmor -o /usr/share/keyrings/docker-archive-keyring.gpg
echo "deb [arch=$(dpkg --print-architecture) signed-by=/usr/share/keyrings/docker-archive-keyring.gpg] https://download.docker.com/linux/ubuntu $(lsb_release -cs) stable" | sudo tee /etc/apt/sources.list.d/docker.list > /dev/null
sudo apt update
```
Once the repository is setup I could install Docker itself and configure it to run as the current user:
```bash frame="terminal" title="Installing Docker"
sudo apt install docker-ce docker-ce-cli containerd.io docker-compose-plugin -y
sudo usermod -aG docker $USER
newgrp docker
```
Finally, I checked the Docker version to ensure it was installed correctly:
```bash frame="terminal" title="Checking the Docker version"
docker --version
Docker version 28.5.0, build 887030f
```
With that done I could start to install n8n locally.
## Preparing the environment
As I will be running a few different services locally on the same machine I decided to use Docker Compose and keep all of the services needed for n8n in one file. We will be running the following containers:
- [docker.n8n.io/n8nio/n8n](https://docs.n8n.io/hosting/installation/docker/): The main n8n service
- [postgres:16](https://hub.docker.com/_/postgres): The PostgreSQL database for n8n
- [cloudflare/cloudflared:latest](https://hub.docker.com/r/cloudflare/cloudflared): The Cloudflare Tunnel for n8n
### Setting up Cloudflare Tunnel
I host all of my domains via Cloudflare (as well as this blog) so using their [Tunnel](https://developers.cloudflare.com/cloudflare-one/connections/connect-networks/) service for routing the traffic to my local n8n instance was a no-brainer.
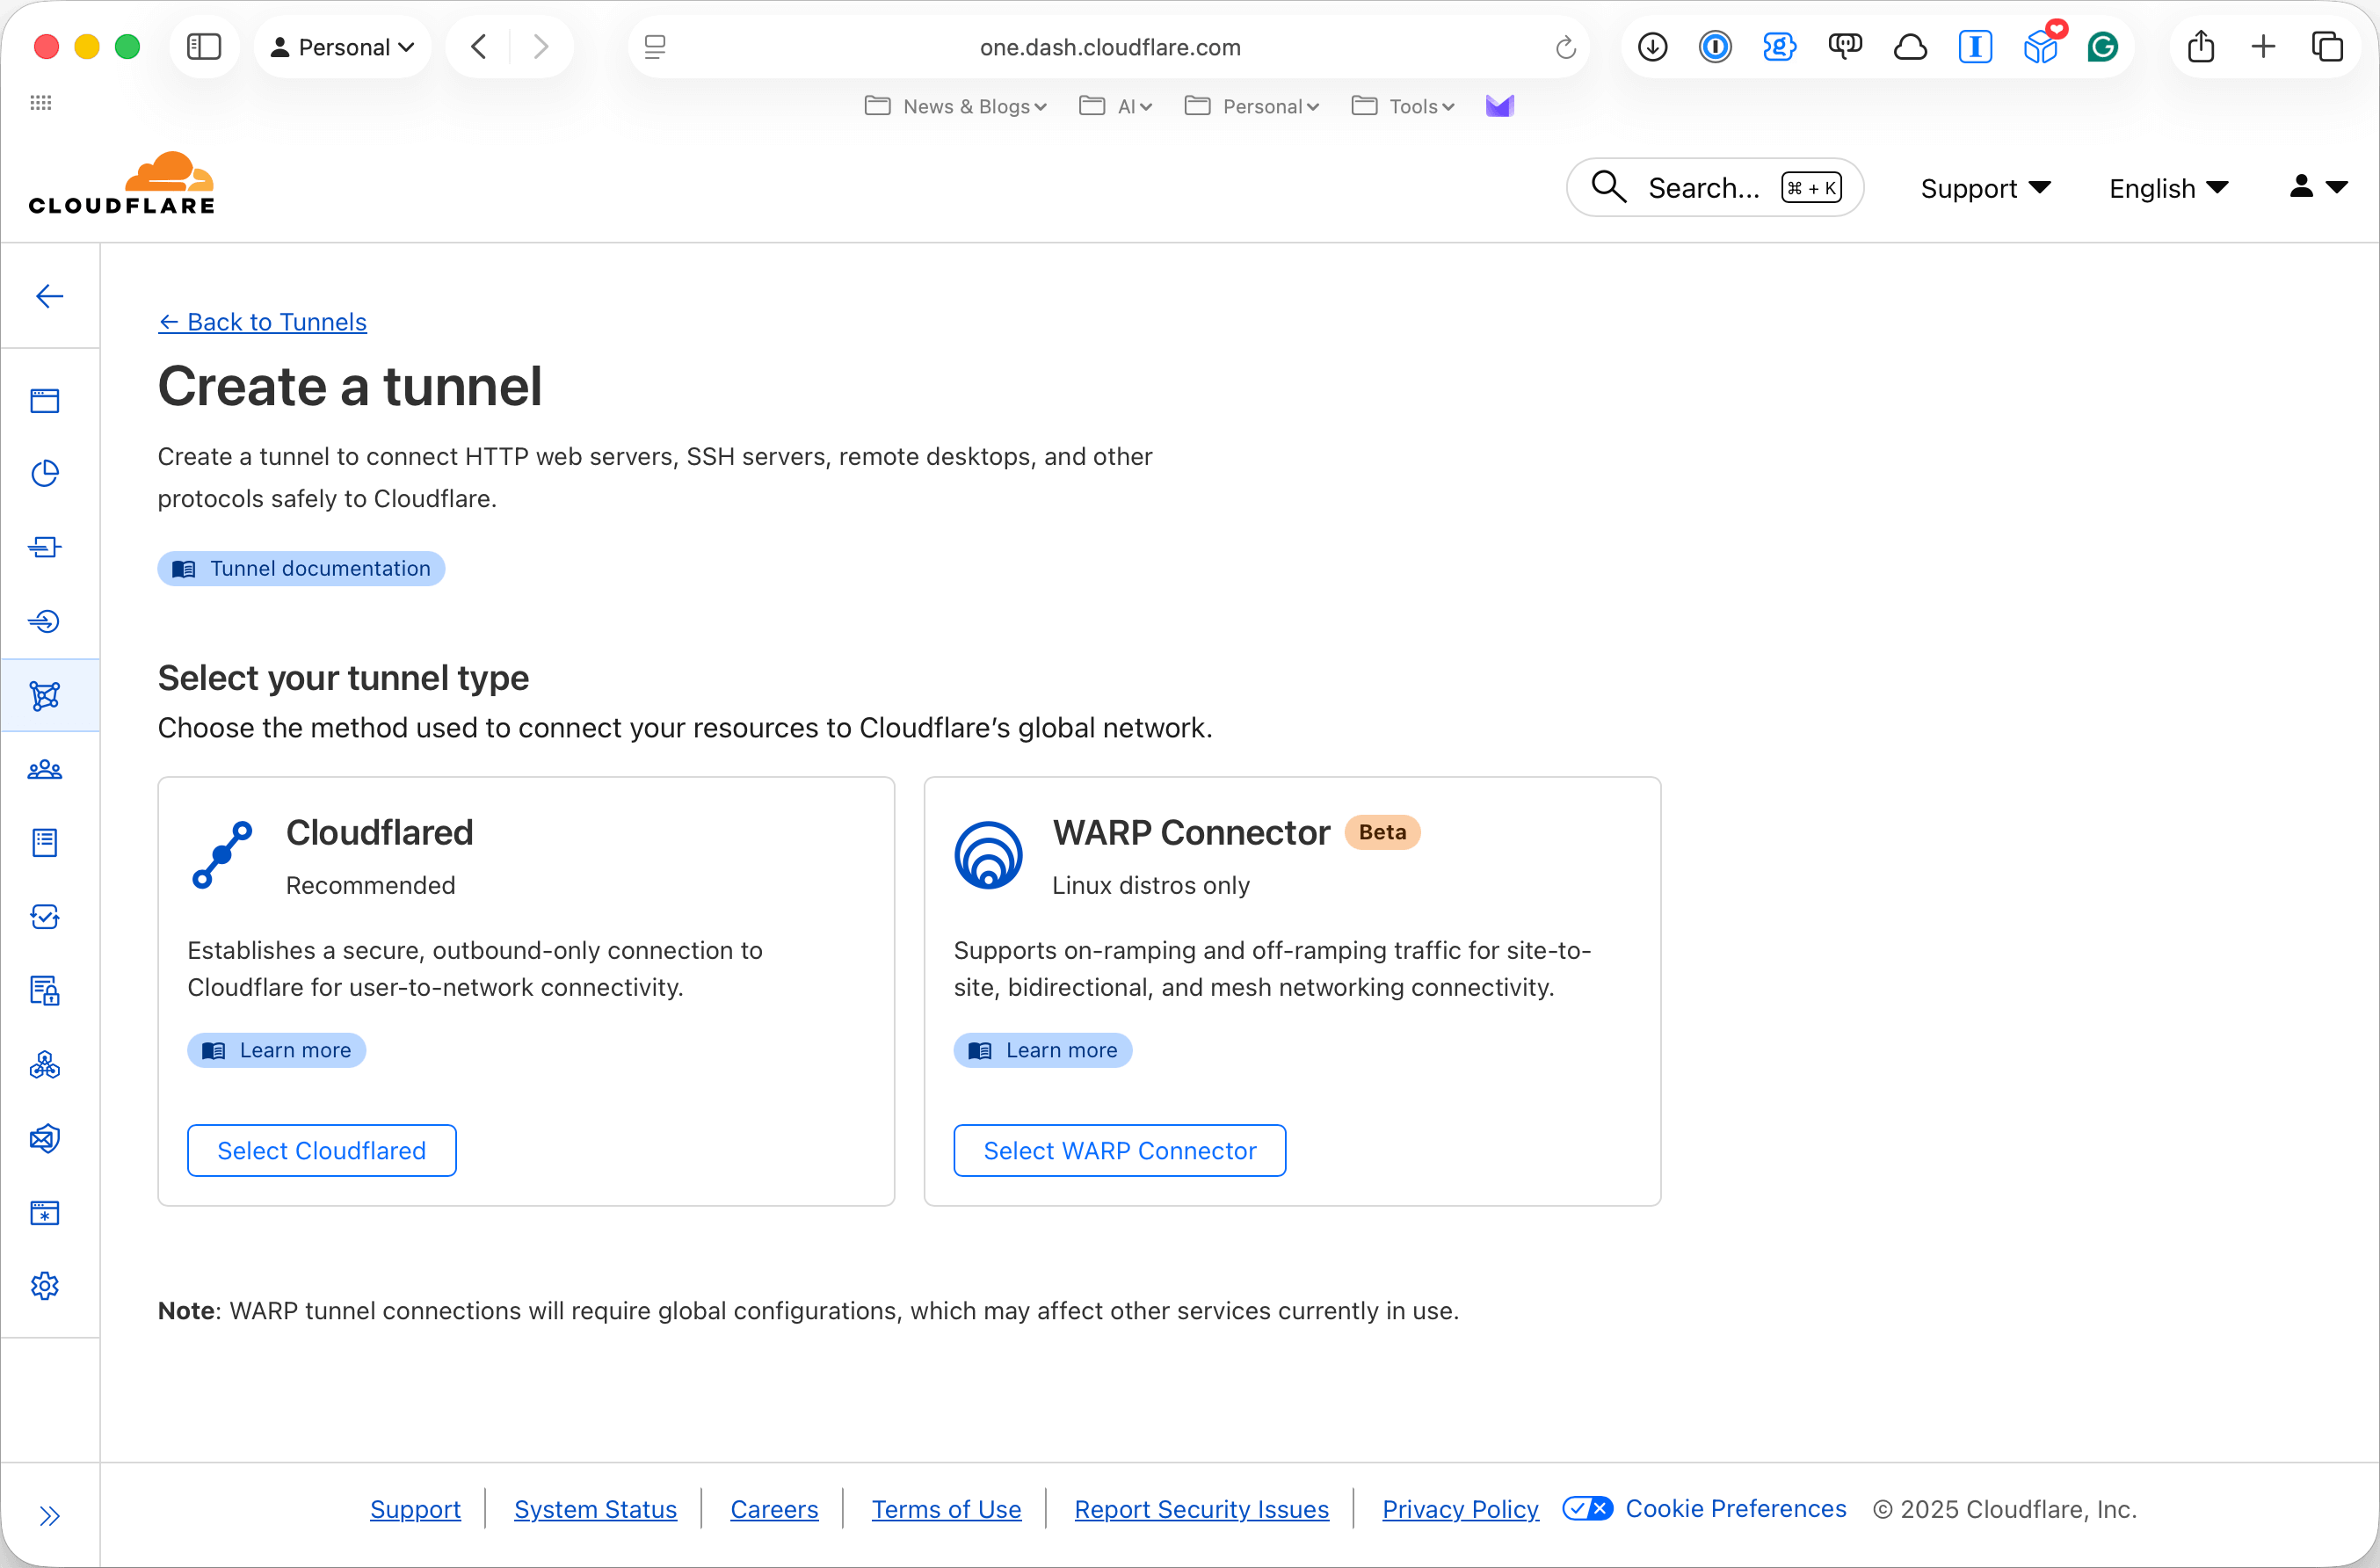
To do this signup for their Zero Trust service, using the free tier is fine, once you have signed up you need to create a new tunnel, you can this by going **Network** > **Tunnels** > **Create a Tunnel**.
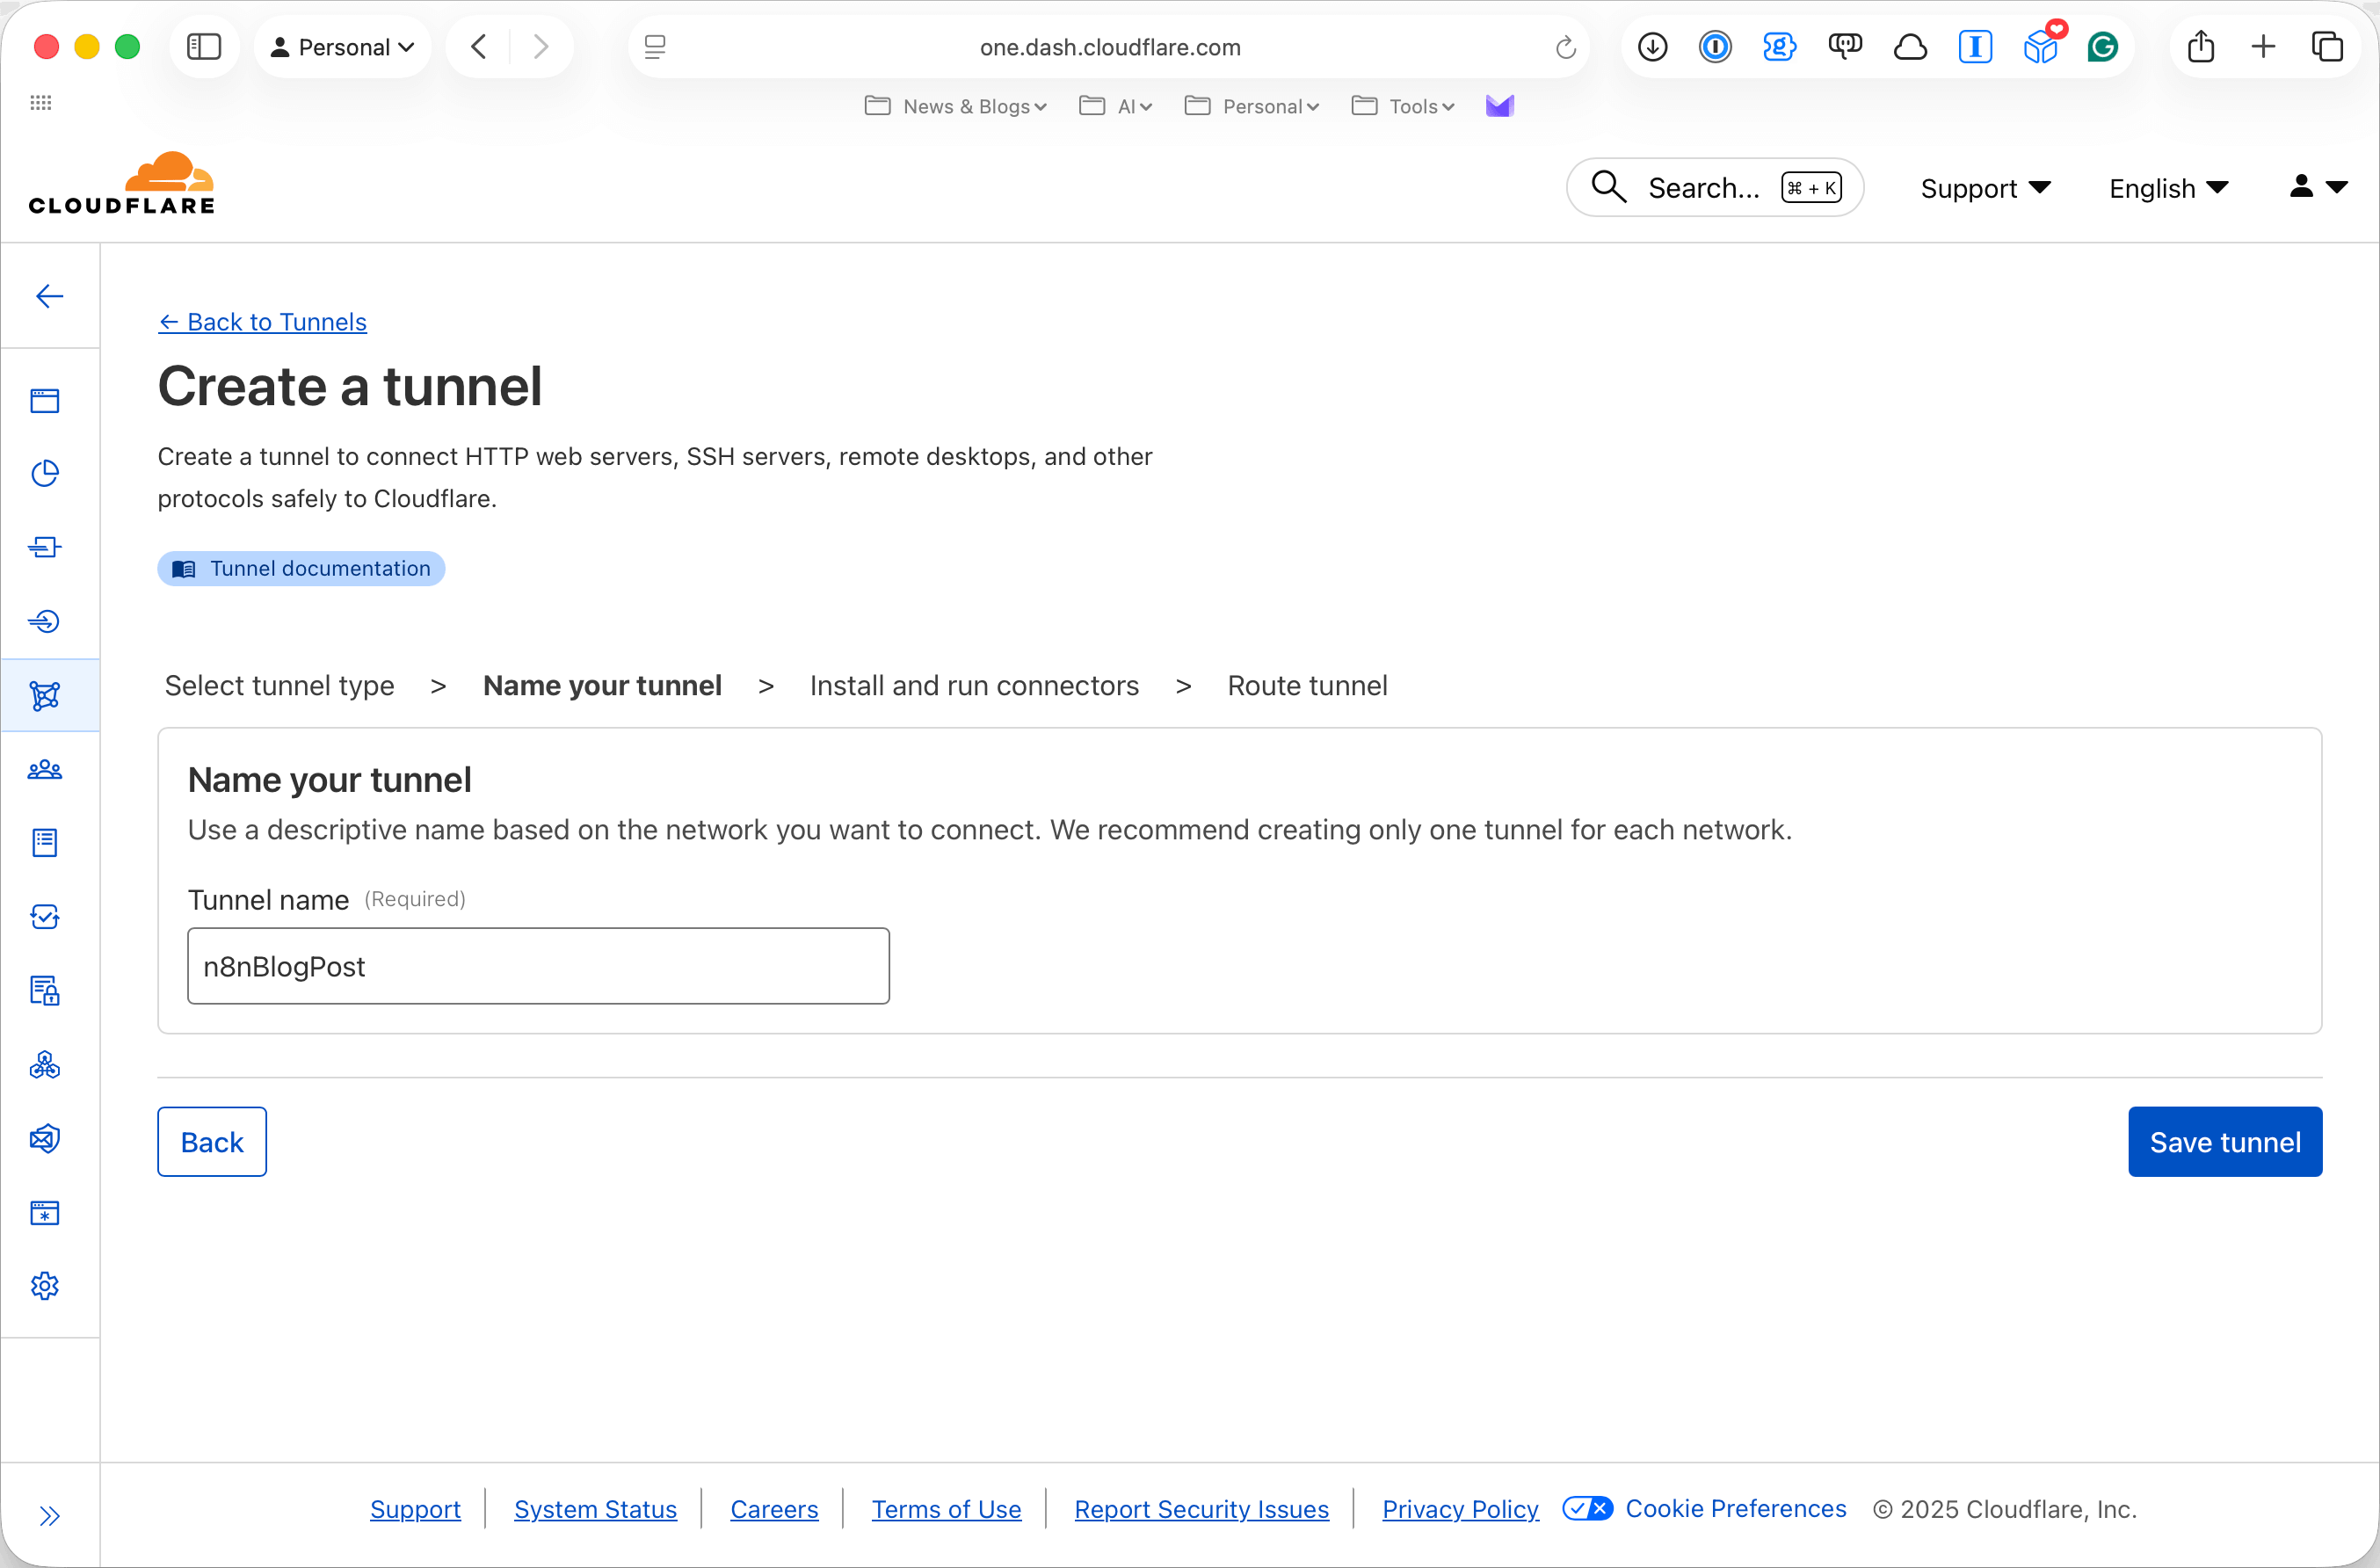
On the Select your tunnel type screen select **Cloudflare**. Next you will be asked to name the tunnel, in the screens below I have called mine **n8nBlogPost**.
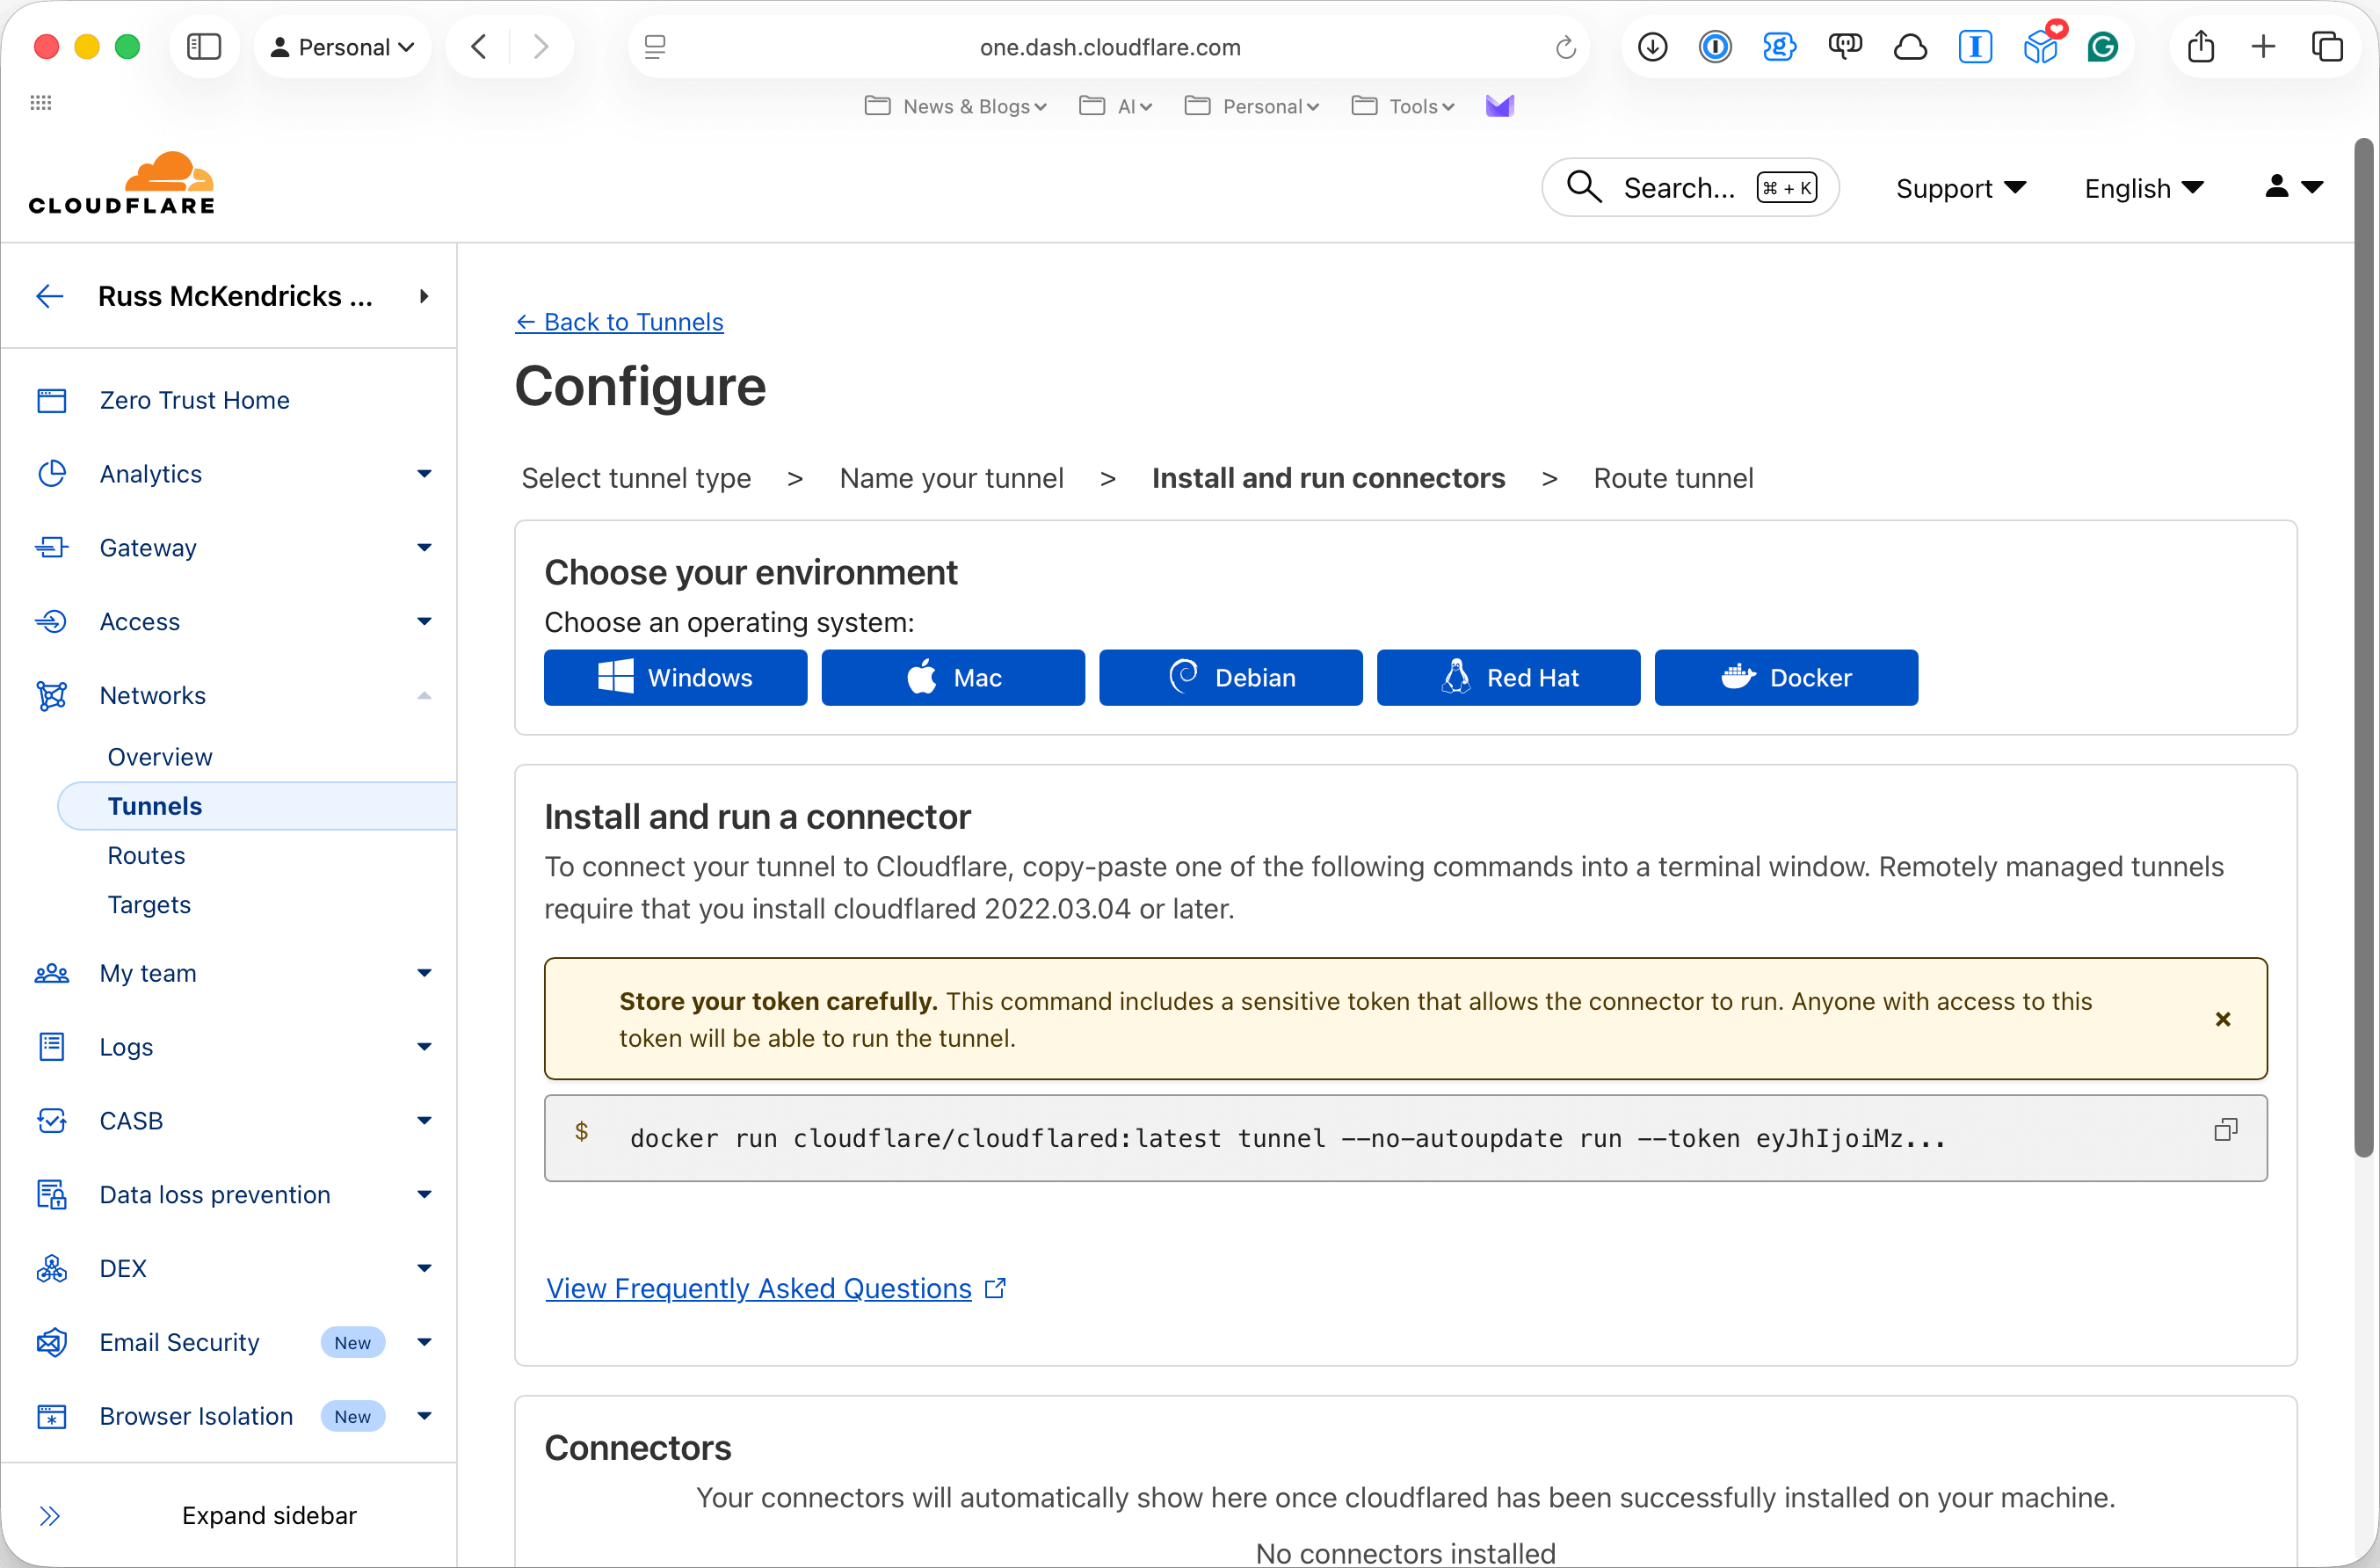
Next you will be taken to the **Install and run connectors** screen, here select **Docker**, copy and page the command you get given as this contains the `--token` parameter you will need to use later the command will look something like this:
```bash frame="terminal" title="Copying the Cloudflare Tunnel token"
docker run cloudflare/cloudflared:latest tunnel \
--no-autoupdate run \
--token eyJhIjoiMzQwODksoTHingRealyLong5YzNotaR4alTok3N
```
Store your token carefully. This is a sensitive token that allows the connector to run. Anyone with access to this token will be able to run the tunnel.
We won't be bringing the tunnel up here, we will do that later when we setup the Docker Compose file so just move onto the next screen.
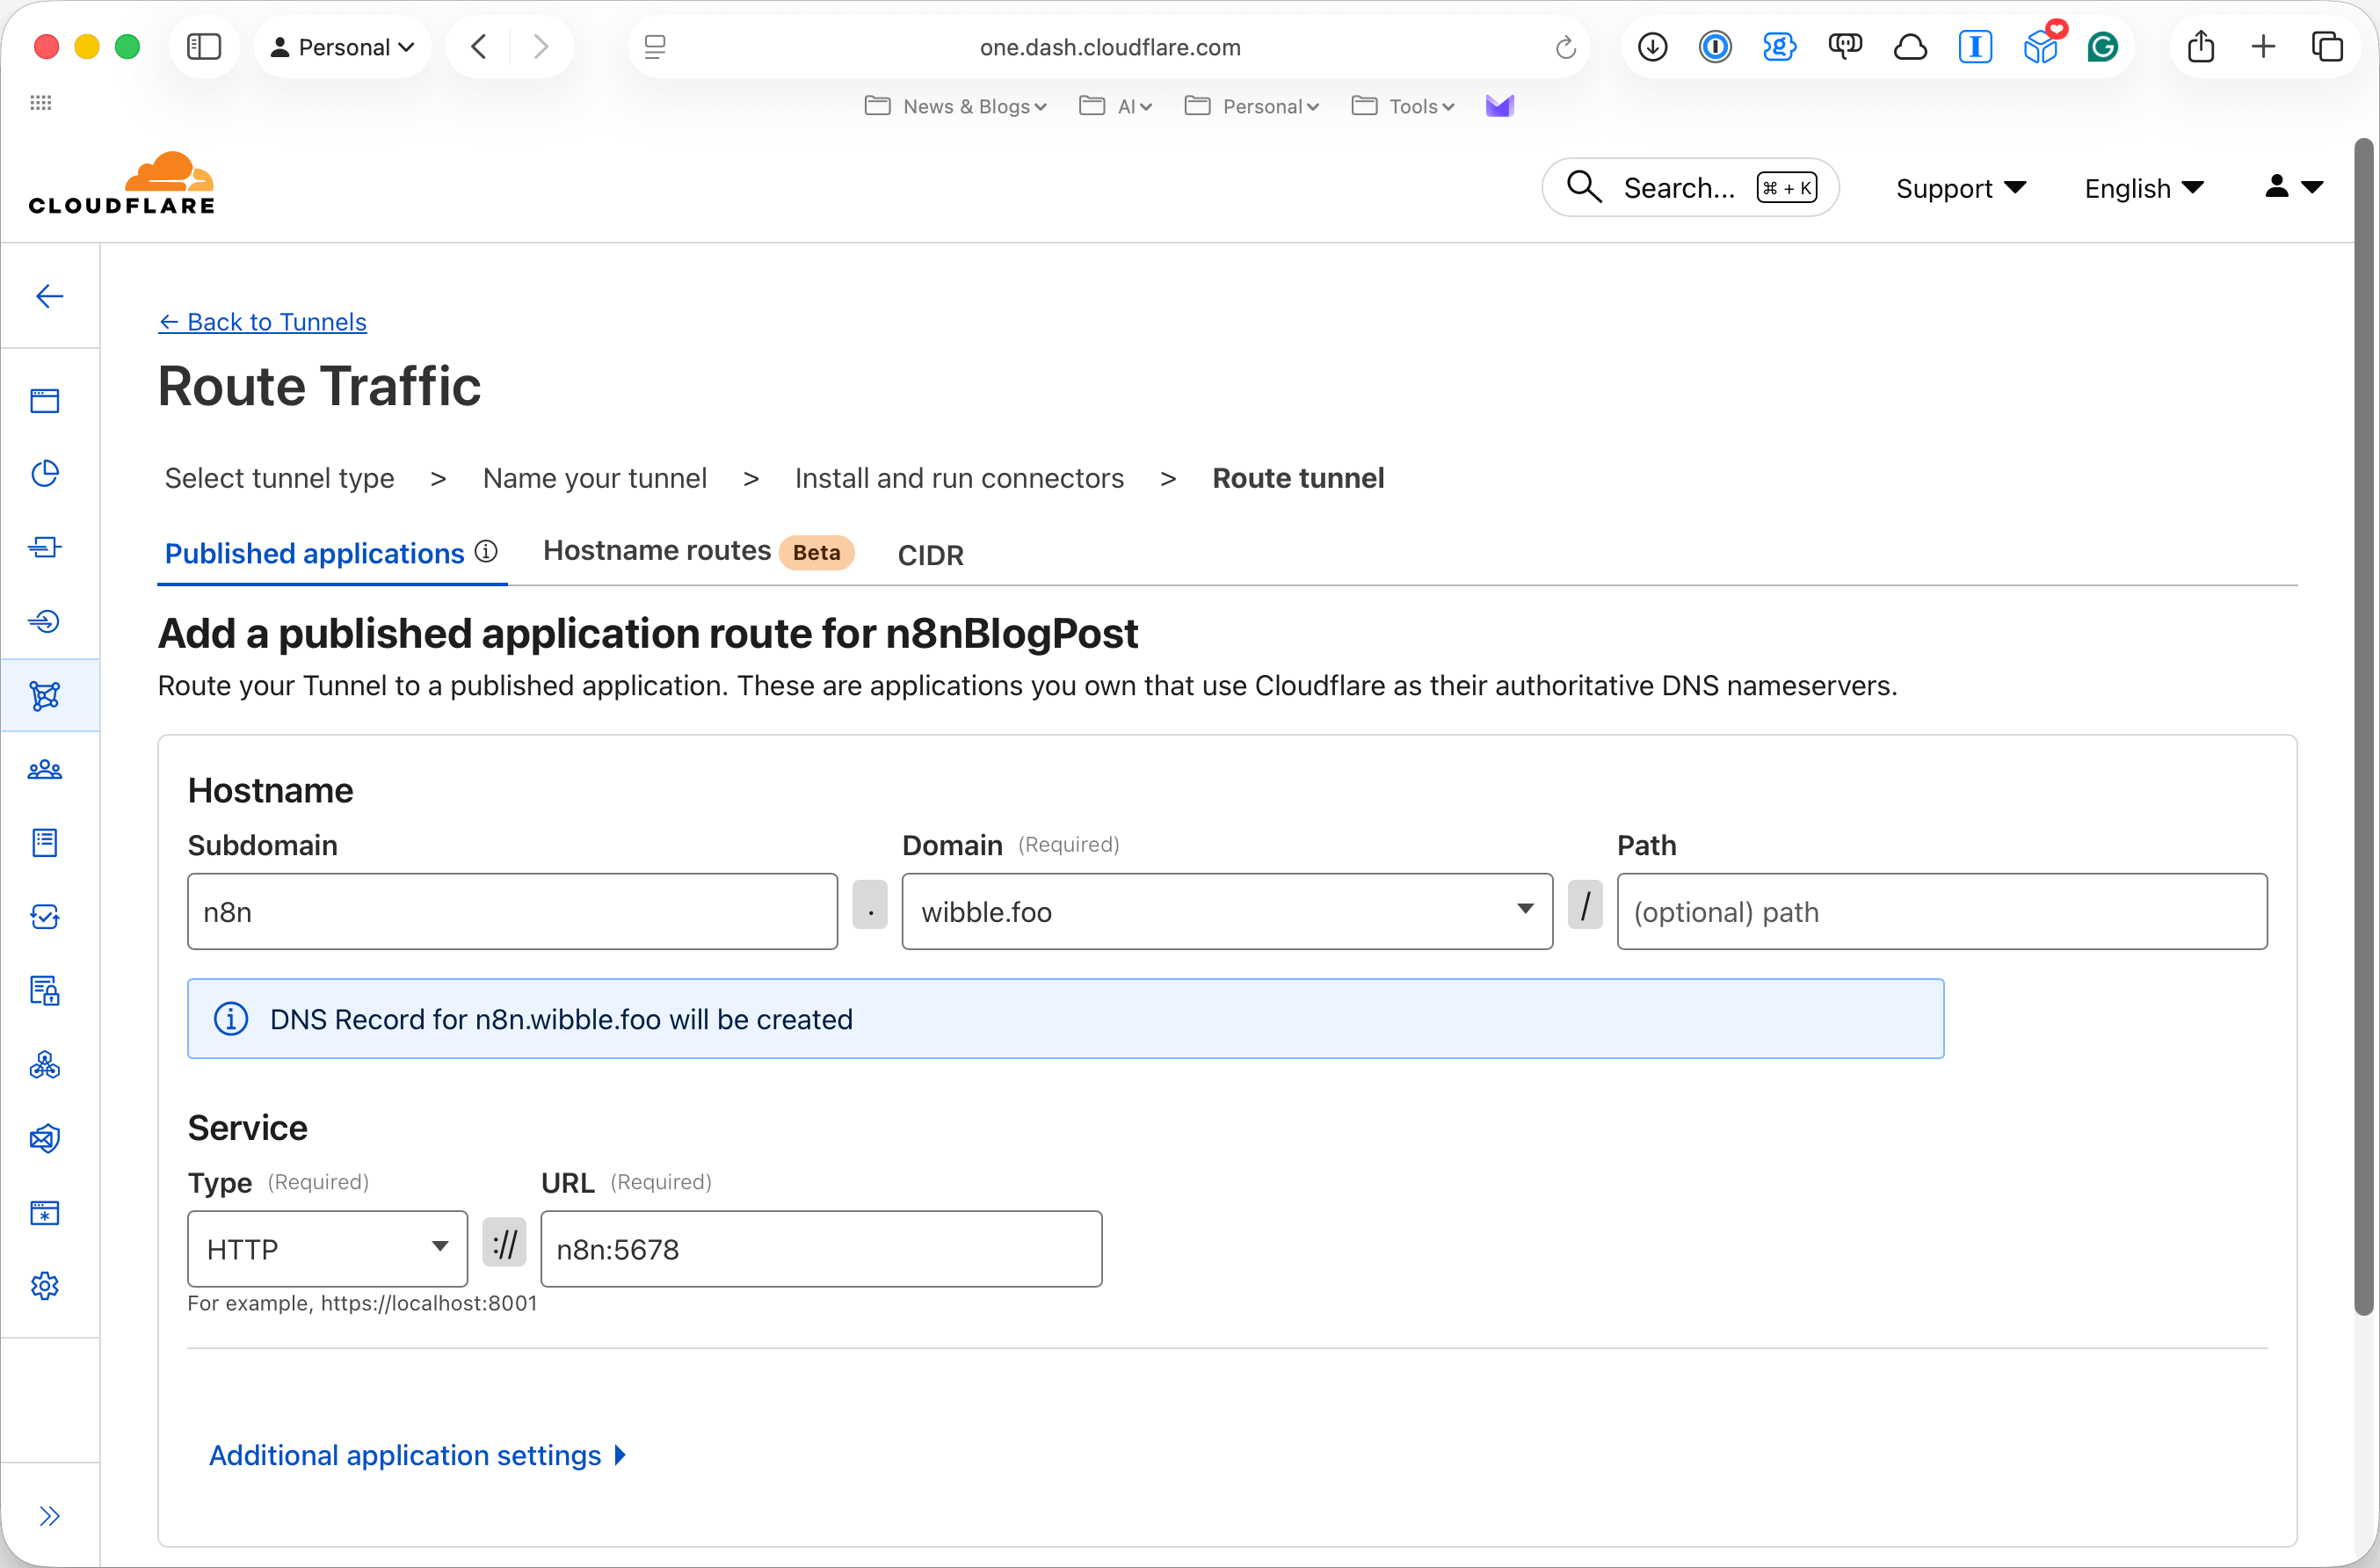
Here, we will be setting up the domain and ports for the tunnel, in the screens below I have called mine **n8n.domain.com** and have used the service we will be tunnelling to:
As you can see from the screenshot above I have set the Hostname as **n8n.wibble.foo** (Yes [wibble.foo](https://wibble.foo) is a real domain I own) and as we will be proxying to our local n8n instance on port 5678 I set the type to **HTTP** and URL as **n8n:5678**.
Once setup we can click on **Complete setup** and you will be taken back to the **Cloudflare Tunnel** screen where you will see your new tunnel listed, as we haven't brought up the connector you will see it as **INACTIVE**, don't worry about this yet.
### Setting the folders and .env file
First we need to generate a secure random key for which will be used for encryption, you can do this by running the following command:
```bash frame="terminal" title="Generating a secure random key for encryption"
openssl rand -hex 32
```
Make a note of the random key and we can move on to creating the folders and setting the permissions:
```bash frame="terminal" title="Setting the folders"
sudo mkdir -p /opt/n8n/local-files
sudo chown -R $USER:$USER /opt/n8n
sudo chown -R 1000:1000 /opt/n8n/local-files
cd /opt/n8n/
vi /opt/n8n/.env
```
Inside the .env file we need to set the following variables (make sure you use your own values):
```text title="Environment variables"
# Domain Configuration
PUBLIC_DOMAIN=n8n.domain.com
# PostgreSQL Configuration
POSTGRES_USER=root
POSTGRES_PASSWORD=some-secure-password-here
POSTGRES_DB=n8n
POSTGRES_NON_ROOT_USER=n8n
POSTGRES_NON_ROOT_PASSWORD=some-secure-password-here
# Timezone
GENERIC_TIMEZONE=Europe/London
# n8n Configuration
# IMPORTANT: Generate a secure random key for encryption
# Use: openssl rand -hex 32
N8N_ENCRYPTION_KEY=random-key-here
# Cloudflare Tunnel Token (get from Cloudflare dashboard)
CLOUDFLARE_TUNNEL_TOKEN=your-cloudflare-tunnel-token
```
Enter the values you generated for the encryption key, set some passwords for the PostgreSQL database and add the Cloudflare Tunnel Token we grabbed earlier (make sure the domain matches the one you set up in Cloudflare) and save the file.
### Download the Database setup script
Next we need to create a script to setup the database:
```bash frame="terminal" title="Creating the database setup script"
curl -L https://raw.githubusercontent.com/russmckendrick/local-n8n-with-cloudflare/refs/heads/main/init-data.sh > /opt/n8n/init-data.sh
```
This will download the script from my [local-n8n-with-cloudflare](https://github.com/russmckendrick/local-n8n-with-cloudflare) GitHub repository.
### Setup Docker Compose file
Next we need to create a Docker Compose file:
```bash frame="terminal" title="Creating the Docker Compose file"
curl -L https://raw.githubusercontent.com/russmckendrick/local-n8n-with-cloudflare/refs/heads/main/docker-compose.yml > /opt/n8n/docker-compose.yml
```
This will download the following file:
```yaml title="Docker Compose file"
volumes:
db_storage:
driver: local
n8n_data:
driver: local
networks:
backend:
driver: bridge
cloudflare:
driver: bridge
services:
postgres:
image: postgres:16
restart: unless-stopped
networks:
- backend
environment:
POSTGRES_USER: ${POSTGRES_USER}
POSTGRES_PASSWORD: ${POSTGRES_PASSWORD}
POSTGRES_DB: ${POSTGRES_DB}
POSTGRES_NON_ROOT_USER: ${POSTGRES_NON_ROOT_USER}
POSTGRES_NON_ROOT_PASSWORD: ${POSTGRES_NON_ROOT_PASSWORD}
volumes:
- db_storage:/var/lib/postgresql/data
- ./init-data.sh:/docker-entrypoint-initdb.d/init-data.sh
healthcheck:
test: ['CMD-SHELL', 'pg_isready -h localhost -U ${POSTGRES_USER} -d ${POSTGRES_DB}']
interval: 10s
timeout: 5s
retries: 5
start_period: 10s
n8n:
image: docker.n8n.io/n8nio/n8n
container_name: n8n
restart: unless-stopped
networks:
- backend
- cloudflare
environment:
DB_TYPE: postgresdb
DB_POSTGRESDB_HOST: postgres
DB_POSTGRESDB_PORT: 5432
DB_POSTGRESDB_DATABASE: ${POSTGRES_DB}
DB_POSTGRESDB_USER: ${POSTGRES_NON_ROOT_USER}
DB_POSTGRESDB_PASSWORD: ${POSTGRES_NON_ROOT_PASSWORD}
EXECUTIONS_MODE: regular
N8N_HOST: ${PUBLIC_DOMAIN}
N8N_PROTOCOL: https
WEBHOOK_URL: https://${PUBLIC_DOMAIN}
GENERIC_TIMEZONE: ${GENERIC_TIMEZONE}
TZ: ${GENERIC_TIMEZONE}
N8N_ENCRYPTION_KEY: ${N8N_ENCRYPTION_KEY}
N8N_ENFORCE_SETTINGS_FILE_PERMISSIONS: true
volumes:
- n8n_data:/home/node/.n8n
- ./local-files:/files
depends_on:
postgres:
condition: service_healthy
healthcheck:
test: ['CMD-SHELL', 'wget --spider -q http://localhost:5678/healthz || exit 1']
interval: 30s
timeout: 10s
retries: 3
start_period: 60s
cloudflared:
image: cloudflare/cloudflared:latest
container_name: cloudflared
restart: unless-stopped
networks:
- cloudflare
command: tunnel --no-autoupdate run --token ${CLOUDFLARE_TUNNEL_TOKEN}
depends_on:
- n8n
```
## Bringing up the n8n containers
We now have everything in place to bring up the containers, to do this run the following command:
```bash frame="terminal" title="Bringing up the containers"
docker compose -f /opt/n8n/docker-compose.yml pull
```
This will pull the images for the containers, next we can bring them up:
```bash frame="terminal" title="Bringing up the containers"
docker compose -f /opt/n8n/docker-compose.yml up -d
```
This should give you the following output:
```bash frame="terminal" title="Bringing up the containers"
[+] Running 5/5
✔ Volume n8n_n8n_data Created 0.1s
✔ Volume n8n_db_storage Created 0.0s
✔ Container n8n-postgres-1 Healthy 5.8s
✔ Container n8n Started 5.9s
✔ Container cloudflared Started 6.0s
```
Once the containers are up and running we can check the logs to ensure everything is working correctly:
```bash frame="terminal" title="Checking the logs"
docker compose -f /opt/n8n/docker-compose.yml logs -f
```
You should see something like the following:
```bash frame="terminal" title="Logs"
n8n |
n8n | [license SDK] Skipping renewal on init: license cert is not initialized
n8n | [Data table] The Data table module is experimental and subject to change.
n8n | Any tables added before the official release may become inaccessible at any point. Use at your own risk.
n8n | Version: 1.113.3
n8n |
n8n | Editor is now accessible via:
n8n | https://n8n.wibble.foo
```
If you open your browser and navigate your domain, for example **https://n8n.wibble.foo** you should see the n8n editor, if you click on the **Sign in** button you should be taken to the login screen, enter the credentials you set up in the .env file and you should be logged in.
That's it, you now have a fully working n8n instance running locally and accessible via Cloudflare Tunnel. Install the free license, grab a coffee and get started with n8n - but thats another post.
## Housekeeping
If you need to update the n8n instance you can do so by running the following command:
```bash frame="terminal" title="Updating the n8n instance"
docker compose -f /opt/n8n/docker-compose.yml down
docker compose -f /opt/n8n/docker-compose.yml pull
docker compose -f /opt/n8n/docker-compose.yml up -d
```
This will stop the current instance, pull the latest images and bring the containers back up.
If you need to remove the instance you can do so by running the following command:
```bash frame="terminal" title="Removing the n8n instance"
docker compose -f /opt/n8n/docker-compose.yml down
```
This will remove the containers and networks, to remove the volumes you can run the following command:
Run the command below with caution, it will remove all of the data and configuration for the n8n instance.
```bash frame="terminal" title="Removing the volumes"
docker volume rm n8n_db_storage n8n_n8n_data
```
## Making it a little more secure
Given that we are running the n8n instance on a local resource, and the tunnel is exposing it to the internet, we can make it a little more secure by fronting the site with a Cloudflare Zero Trust login. This will prevent anyone from accessing the n8n instance without being validated via Cloudflare.
To do this go to the Cloudflare dashboard and navigate to **Zero Trust** > **Access** > **Applications** > **Add an Application**; the first screen will ask you to select the application type, select **Self hosted** and click on **Next**.
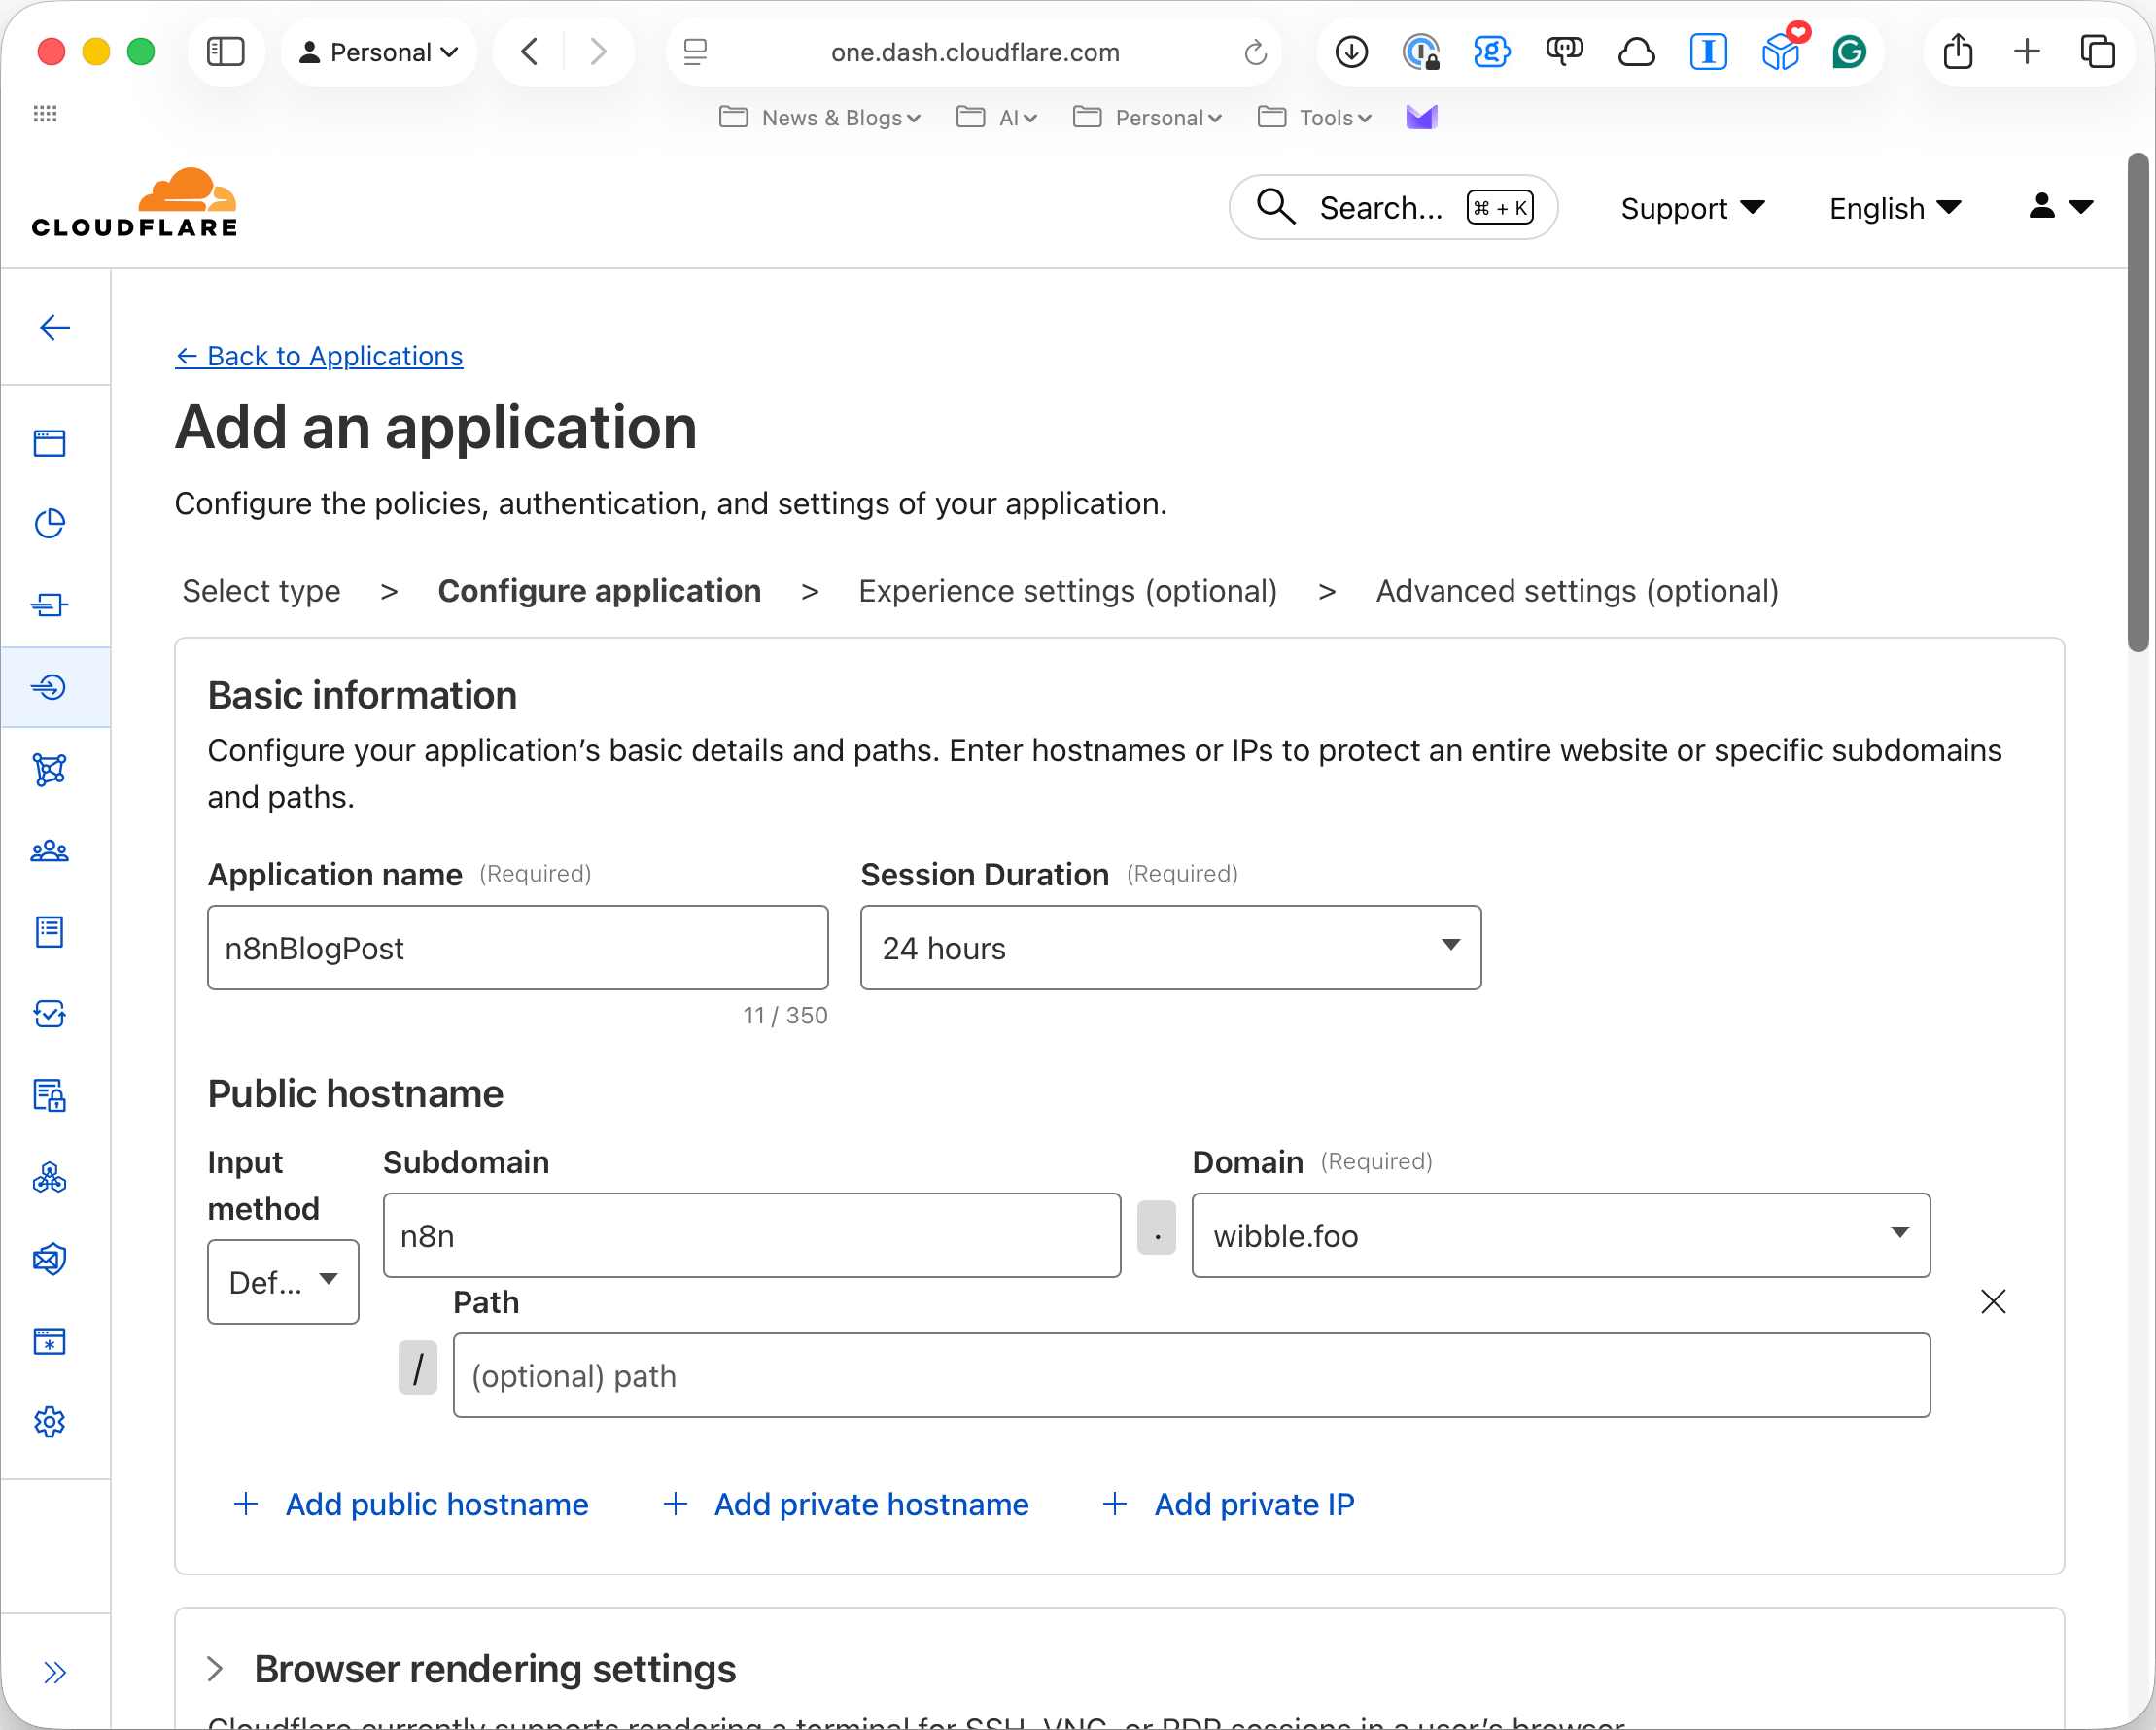
Next give your application a name, in the screens below I have called mine **n8nBlogPost**, then in the public hostname section enter the URL of your n8n instance, in the screens below I have entered **n8n.wibble.foo**:
Now we need to add a policy to the application, click on **+ Create new policy** where you will be taken to the **Add policy** screen, here enter a name for the policy, I have called mine **n8nBlogPostPolicy**. Then scroll down to the **Add rules** section, by default there will an Include rule waiting to be added, in the **Selector** select **Emails ending in** and enter the domain name of your email provider, in my example I have entered **wibble.email**. Now click on **+ Add require**, in the **Selector** this time select **Country** and enter the country(s) you want to allow access from, in my example I have entered **United Kingdom** and click on **Next**.
This will create a policy that will allow access to the n8n instance from the United Kingdom for users with an email ending in **wibble.email**. Click on **Save** and return to the tab where you are configuring the application, here click on **Select existing policy** and select the policy you just created.
Under **Login methods** select **Accept all available identity providers** and click on **Next**. The next two screens are both optional and can be left at their defaults. Finally, click on **Save** and you will be taken to the **Application** screen where you will see your new application listed.
Once configured and goto your n8n domain you should be prompted to login with Cloudflare, once you have done this you will be taken to the n8n editor:
If you were to try and access the n8n instance from outside the United Kingdom you would be denied access:
Same for not using the correct email ending in **wibble.email**. The advantage of this is that unless you meet the criteria you will not be able to access the n8n instance; which means no traffic to your local machine from random people or bots on the internet.
## Summary
In this post, we explored how to install n8n on a local resource using Docker and route it via Cloudflare. We saw how easy it is to setup a local n8n instance and how to use Cloudflare Tunnel to route the traffic to it.
Here are the links to n8n and the repository we downloaded the files from:
The following audio summary of this blog post was generated by [NotebookLM](https://notebooklm.google).
 On the Select your tunnel type screen select **Cloudflare**. Next you will be asked to name the tunnel, in the screens below I have called mine **n8nBlogPost**.
 Next you will be taken to the **Install and run connectors** screen, here select **Docker**, copy and page the command you get given as this contains the `--token` parameter you will need to use later the command will look something like this:
```bash frame="terminal" title="Copying the Cloudflare Tunnel token"
docker run cloudflare/cloudflared:latest tunnel \
--no-autoupdate run \
--token eyJhIjoiMzQwODksoTHingRealyLong5YzNotaR4alTok3N
```
Next you will be taken to the **Install and run connectors** screen, here select **Docker**, copy and page the command you get given as this contains the `--token` parameter you will need to use later the command will look something like this:
```bash frame="terminal" title="Copying the Cloudflare Tunnel token"
docker run cloudflare/cloudflared:latest tunnel \
--no-autoupdate run \
--token eyJhIjoiMzQwODksoTHingRealyLong5YzNotaR4alTok3N
```
 We won't be bringing the tunnel up here, we will do that later when we setup the Docker Compose file so just move onto the next screen.
Here, we will be setting up the domain and ports for the tunnel, in the screens below I have called mine **n8n.domain.com** and have used the service we will be tunnelling to:
We won't be bringing the tunnel up here, we will do that later when we setup the Docker Compose file so just move onto the next screen.
Here, we will be setting up the domain and ports for the tunnel, in the screens below I have called mine **n8n.domain.com** and have used the service we will be tunnelling to:
 As you can see from the screenshot above I have set the Hostname as **n8n.wibble.foo** (Yes [wibble.foo](https://wibble.foo) is a real domain I own) and as we will be proxying to our local n8n instance on port 5678 I set the type to **HTTP** and URL as **n8n:5678**.
Once setup we can click on **Complete setup** and you will be taken back to the **Cloudflare Tunnel** screen where you will see your new tunnel listed, as we haven't brought up the connector you will see it as **INACTIVE**, don't worry about this yet.
### Setting the folders and .env file
First we need to generate a secure random key for which will be used for encryption, you can do this by running the following command:
```bash frame="terminal" title="Generating a secure random key for encryption"
openssl rand -hex 32
```
Make a note of the random key and we can move on to creating the folders and setting the permissions:
```bash frame="terminal" title="Setting the folders"
sudo mkdir -p /opt/n8n/local-files
sudo chown -R $USER:$USER /opt/n8n
sudo chown -R 1000:1000 /opt/n8n/local-files
cd /opt/n8n/
vi /opt/n8n/.env
```
Inside the .env file we need to set the following variables (make sure you use your own values):
```text title="Environment variables"
# Domain Configuration
PUBLIC_DOMAIN=n8n.domain.com
# PostgreSQL Configuration
POSTGRES_USER=root
POSTGRES_PASSWORD=some-secure-password-here
POSTGRES_DB=n8n
POSTGRES_NON_ROOT_USER=n8n
POSTGRES_NON_ROOT_PASSWORD=some-secure-password-here
# Timezone
GENERIC_TIMEZONE=Europe/London
# n8n Configuration
# IMPORTANT: Generate a secure random key for encryption
# Use: openssl rand -hex 32
N8N_ENCRYPTION_KEY=random-key-here
# Cloudflare Tunnel Token (get from Cloudflare dashboard)
CLOUDFLARE_TUNNEL_TOKEN=your-cloudflare-tunnel-token
```
Enter the values you generated for the encryption key, set some passwords for the PostgreSQL database and add the Cloudflare Tunnel Token we grabbed earlier (make sure the domain matches the one you set up in Cloudflare) and save the file.
### Download the Database setup script
Next we need to create a script to setup the database:
```bash frame="terminal" title="Creating the database setup script"
curl -L https://raw.githubusercontent.com/russmckendrick/local-n8n-with-cloudflare/refs/heads/main/init-data.sh > /opt/n8n/init-data.sh
```
This will download the script from my [local-n8n-with-cloudflare](https://github.com/russmckendrick/local-n8n-with-cloudflare) GitHub repository.
### Setup Docker Compose file
Next we need to create a Docker Compose file:
```bash frame="terminal" title="Creating the Docker Compose file"
curl -L https://raw.githubusercontent.com/russmckendrick/local-n8n-with-cloudflare/refs/heads/main/docker-compose.yml > /opt/n8n/docker-compose.yml
```
This will download the following file:
```yaml title="Docker Compose file"
volumes:
db_storage:
driver: local
n8n_data:
driver: local
networks:
backend:
driver: bridge
cloudflare:
driver: bridge
services:
postgres:
image: postgres:16
restart: unless-stopped
networks:
- backend
environment:
POSTGRES_USER: ${POSTGRES_USER}
POSTGRES_PASSWORD: ${POSTGRES_PASSWORD}
POSTGRES_DB: ${POSTGRES_DB}
POSTGRES_NON_ROOT_USER: ${POSTGRES_NON_ROOT_USER}
POSTGRES_NON_ROOT_PASSWORD: ${POSTGRES_NON_ROOT_PASSWORD}
volumes:
- db_storage:/var/lib/postgresql/data
- ./init-data.sh:/docker-entrypoint-initdb.d/init-data.sh
healthcheck:
test: ['CMD-SHELL', 'pg_isready -h localhost -U ${POSTGRES_USER} -d ${POSTGRES_DB}']
interval: 10s
timeout: 5s
retries: 5
start_period: 10s
n8n:
image: docker.n8n.io/n8nio/n8n
container_name: n8n
restart: unless-stopped
networks:
- backend
- cloudflare
environment:
DB_TYPE: postgresdb
DB_POSTGRESDB_HOST: postgres
DB_POSTGRESDB_PORT: 5432
DB_POSTGRESDB_DATABASE: ${POSTGRES_DB}
DB_POSTGRESDB_USER: ${POSTGRES_NON_ROOT_USER}
DB_POSTGRESDB_PASSWORD: ${POSTGRES_NON_ROOT_PASSWORD}
EXECUTIONS_MODE: regular
N8N_HOST: ${PUBLIC_DOMAIN}
N8N_PROTOCOL: https
WEBHOOK_URL: https://${PUBLIC_DOMAIN}
GENERIC_TIMEZONE: ${GENERIC_TIMEZONE}
TZ: ${GENERIC_TIMEZONE}
N8N_ENCRYPTION_KEY: ${N8N_ENCRYPTION_KEY}
N8N_ENFORCE_SETTINGS_FILE_PERMISSIONS: true
volumes:
- n8n_data:/home/node/.n8n
- ./local-files:/files
depends_on:
postgres:
condition: service_healthy
healthcheck:
test: ['CMD-SHELL', 'wget --spider -q http://localhost:5678/healthz || exit 1']
interval: 30s
timeout: 10s
retries: 3
start_period: 60s
cloudflared:
image: cloudflare/cloudflared:latest
container_name: cloudflared
restart: unless-stopped
networks:
- cloudflare
command: tunnel --no-autoupdate run --token ${CLOUDFLARE_TUNNEL_TOKEN}
depends_on:
- n8n
```
## Bringing up the n8n containers
We now have everything in place to bring up the containers, to do this run the following command:
```bash frame="terminal" title="Bringing up the containers"
docker compose -f /opt/n8n/docker-compose.yml pull
```
This will pull the images for the containers, next we can bring them up:
```bash frame="terminal" title="Bringing up the containers"
docker compose -f /opt/n8n/docker-compose.yml up -d
```
This should give you the following output:
```bash frame="terminal" title="Bringing up the containers"
[+] Running 5/5
✔ Volume n8n_n8n_data Created 0.1s
✔ Volume n8n_db_storage Created 0.0s
✔ Container n8n-postgres-1 Healthy 5.8s
✔ Container n8n Started 5.9s
✔ Container cloudflared Started 6.0s
```
Once the containers are up and running we can check the logs to ensure everything is working correctly:
```bash frame="terminal" title="Checking the logs"
docker compose -f /opt/n8n/docker-compose.yml logs -f
```
You should see something like the following:
```bash frame="terminal" title="Logs"
n8n |
n8n | [license SDK] Skipping renewal on init: license cert is not initialized
n8n | [Data table] The Data table module is experimental and subject to change.
n8n | Any tables added before the official release may become inaccessible at any point. Use at your own risk.
n8n | Version: 1.113.3
n8n |
n8n | Editor is now accessible via:
n8n | https://n8n.wibble.foo
```
If you open your browser and navigate your domain, for example **https://n8n.wibble.foo** you should see the n8n editor, if you click on the **Sign in** button you should be taken to the login screen, enter the credentials you set up in the .env file and you should be logged in.
As you can see from the screenshot above I have set the Hostname as **n8n.wibble.foo** (Yes [wibble.foo](https://wibble.foo) is a real domain I own) and as we will be proxying to our local n8n instance on port 5678 I set the type to **HTTP** and URL as **n8n:5678**.
Once setup we can click on **Complete setup** and you will be taken back to the **Cloudflare Tunnel** screen where you will see your new tunnel listed, as we haven't brought up the connector you will see it as **INACTIVE**, don't worry about this yet.
### Setting the folders and .env file
First we need to generate a secure random key for which will be used for encryption, you can do this by running the following command:
```bash frame="terminal" title="Generating a secure random key for encryption"
openssl rand -hex 32
```
Make a note of the random key and we can move on to creating the folders and setting the permissions:
```bash frame="terminal" title="Setting the folders"
sudo mkdir -p /opt/n8n/local-files
sudo chown -R $USER:$USER /opt/n8n
sudo chown -R 1000:1000 /opt/n8n/local-files
cd /opt/n8n/
vi /opt/n8n/.env
```
Inside the .env file we need to set the following variables (make sure you use your own values):
```text title="Environment variables"
# Domain Configuration
PUBLIC_DOMAIN=n8n.domain.com
# PostgreSQL Configuration
POSTGRES_USER=root
POSTGRES_PASSWORD=some-secure-password-here
POSTGRES_DB=n8n
POSTGRES_NON_ROOT_USER=n8n
POSTGRES_NON_ROOT_PASSWORD=some-secure-password-here
# Timezone
GENERIC_TIMEZONE=Europe/London
# n8n Configuration
# IMPORTANT: Generate a secure random key for encryption
# Use: openssl rand -hex 32
N8N_ENCRYPTION_KEY=random-key-here
# Cloudflare Tunnel Token (get from Cloudflare dashboard)
CLOUDFLARE_TUNNEL_TOKEN=your-cloudflare-tunnel-token
```
Enter the values you generated for the encryption key, set some passwords for the PostgreSQL database and add the Cloudflare Tunnel Token we grabbed earlier (make sure the domain matches the one you set up in Cloudflare) and save the file.
### Download the Database setup script
Next we need to create a script to setup the database:
```bash frame="terminal" title="Creating the database setup script"
curl -L https://raw.githubusercontent.com/russmckendrick/local-n8n-with-cloudflare/refs/heads/main/init-data.sh > /opt/n8n/init-data.sh
```
This will download the script from my [local-n8n-with-cloudflare](https://github.com/russmckendrick/local-n8n-with-cloudflare) GitHub repository.
### Setup Docker Compose file
Next we need to create a Docker Compose file:
```bash frame="terminal" title="Creating the Docker Compose file"
curl -L https://raw.githubusercontent.com/russmckendrick/local-n8n-with-cloudflare/refs/heads/main/docker-compose.yml > /opt/n8n/docker-compose.yml
```
This will download the following file:
```yaml title="Docker Compose file"
volumes:
db_storage:
driver: local
n8n_data:
driver: local
networks:
backend:
driver: bridge
cloudflare:
driver: bridge
services:
postgres:
image: postgres:16
restart: unless-stopped
networks:
- backend
environment:
POSTGRES_USER: ${POSTGRES_USER}
POSTGRES_PASSWORD: ${POSTGRES_PASSWORD}
POSTGRES_DB: ${POSTGRES_DB}
POSTGRES_NON_ROOT_USER: ${POSTGRES_NON_ROOT_USER}
POSTGRES_NON_ROOT_PASSWORD: ${POSTGRES_NON_ROOT_PASSWORD}
volumes:
- db_storage:/var/lib/postgresql/data
- ./init-data.sh:/docker-entrypoint-initdb.d/init-data.sh
healthcheck:
test: ['CMD-SHELL', 'pg_isready -h localhost -U ${POSTGRES_USER} -d ${POSTGRES_DB}']
interval: 10s
timeout: 5s
retries: 5
start_period: 10s
n8n:
image: docker.n8n.io/n8nio/n8n
container_name: n8n
restart: unless-stopped
networks:
- backend
- cloudflare
environment:
DB_TYPE: postgresdb
DB_POSTGRESDB_HOST: postgres
DB_POSTGRESDB_PORT: 5432
DB_POSTGRESDB_DATABASE: ${POSTGRES_DB}
DB_POSTGRESDB_USER: ${POSTGRES_NON_ROOT_USER}
DB_POSTGRESDB_PASSWORD: ${POSTGRES_NON_ROOT_PASSWORD}
EXECUTIONS_MODE: regular
N8N_HOST: ${PUBLIC_DOMAIN}
N8N_PROTOCOL: https
WEBHOOK_URL: https://${PUBLIC_DOMAIN}
GENERIC_TIMEZONE: ${GENERIC_TIMEZONE}
TZ: ${GENERIC_TIMEZONE}
N8N_ENCRYPTION_KEY: ${N8N_ENCRYPTION_KEY}
N8N_ENFORCE_SETTINGS_FILE_PERMISSIONS: true
volumes:
- n8n_data:/home/node/.n8n
- ./local-files:/files
depends_on:
postgres:
condition: service_healthy
healthcheck:
test: ['CMD-SHELL', 'wget --spider -q http://localhost:5678/healthz || exit 1']
interval: 30s
timeout: 10s
retries: 3
start_period: 60s
cloudflared:
image: cloudflare/cloudflared:latest
container_name: cloudflared
restart: unless-stopped
networks:
- cloudflare
command: tunnel --no-autoupdate run --token ${CLOUDFLARE_TUNNEL_TOKEN}
depends_on:
- n8n
```
## Bringing up the n8n containers
We now have everything in place to bring up the containers, to do this run the following command:
```bash frame="terminal" title="Bringing up the containers"
docker compose -f /opt/n8n/docker-compose.yml pull
```
This will pull the images for the containers, next we can bring them up:
```bash frame="terminal" title="Bringing up the containers"
docker compose -f /opt/n8n/docker-compose.yml up -d
```
This should give you the following output:
```bash frame="terminal" title="Bringing up the containers"
[+] Running 5/5
✔ Volume n8n_n8n_data Created 0.1s
✔ Volume n8n_db_storage Created 0.0s
✔ Container n8n-postgres-1 Healthy 5.8s
✔ Container n8n Started 5.9s
✔ Container cloudflared Started 6.0s
```
Once the containers are up and running we can check the logs to ensure everything is working correctly:
```bash frame="terminal" title="Checking the logs"
docker compose -f /opt/n8n/docker-compose.yml logs -f
```
You should see something like the following:
```bash frame="terminal" title="Logs"
n8n |
n8n | [license SDK] Skipping renewal on init: license cert is not initialized
n8n | [Data table] The Data table module is experimental and subject to change.
n8n | Any tables added before the official release may become inaccessible at any point. Use at your own risk.
n8n | Version: 1.113.3
n8n |
n8n | Editor is now accessible via:
n8n | https://n8n.wibble.foo
```
If you open your browser and navigate your domain, for example **https://n8n.wibble.foo** you should see the n8n editor, if you click on the **Sign in** button you should be taken to the login screen, enter the credentials you set up in the .env file and you should be logged in.
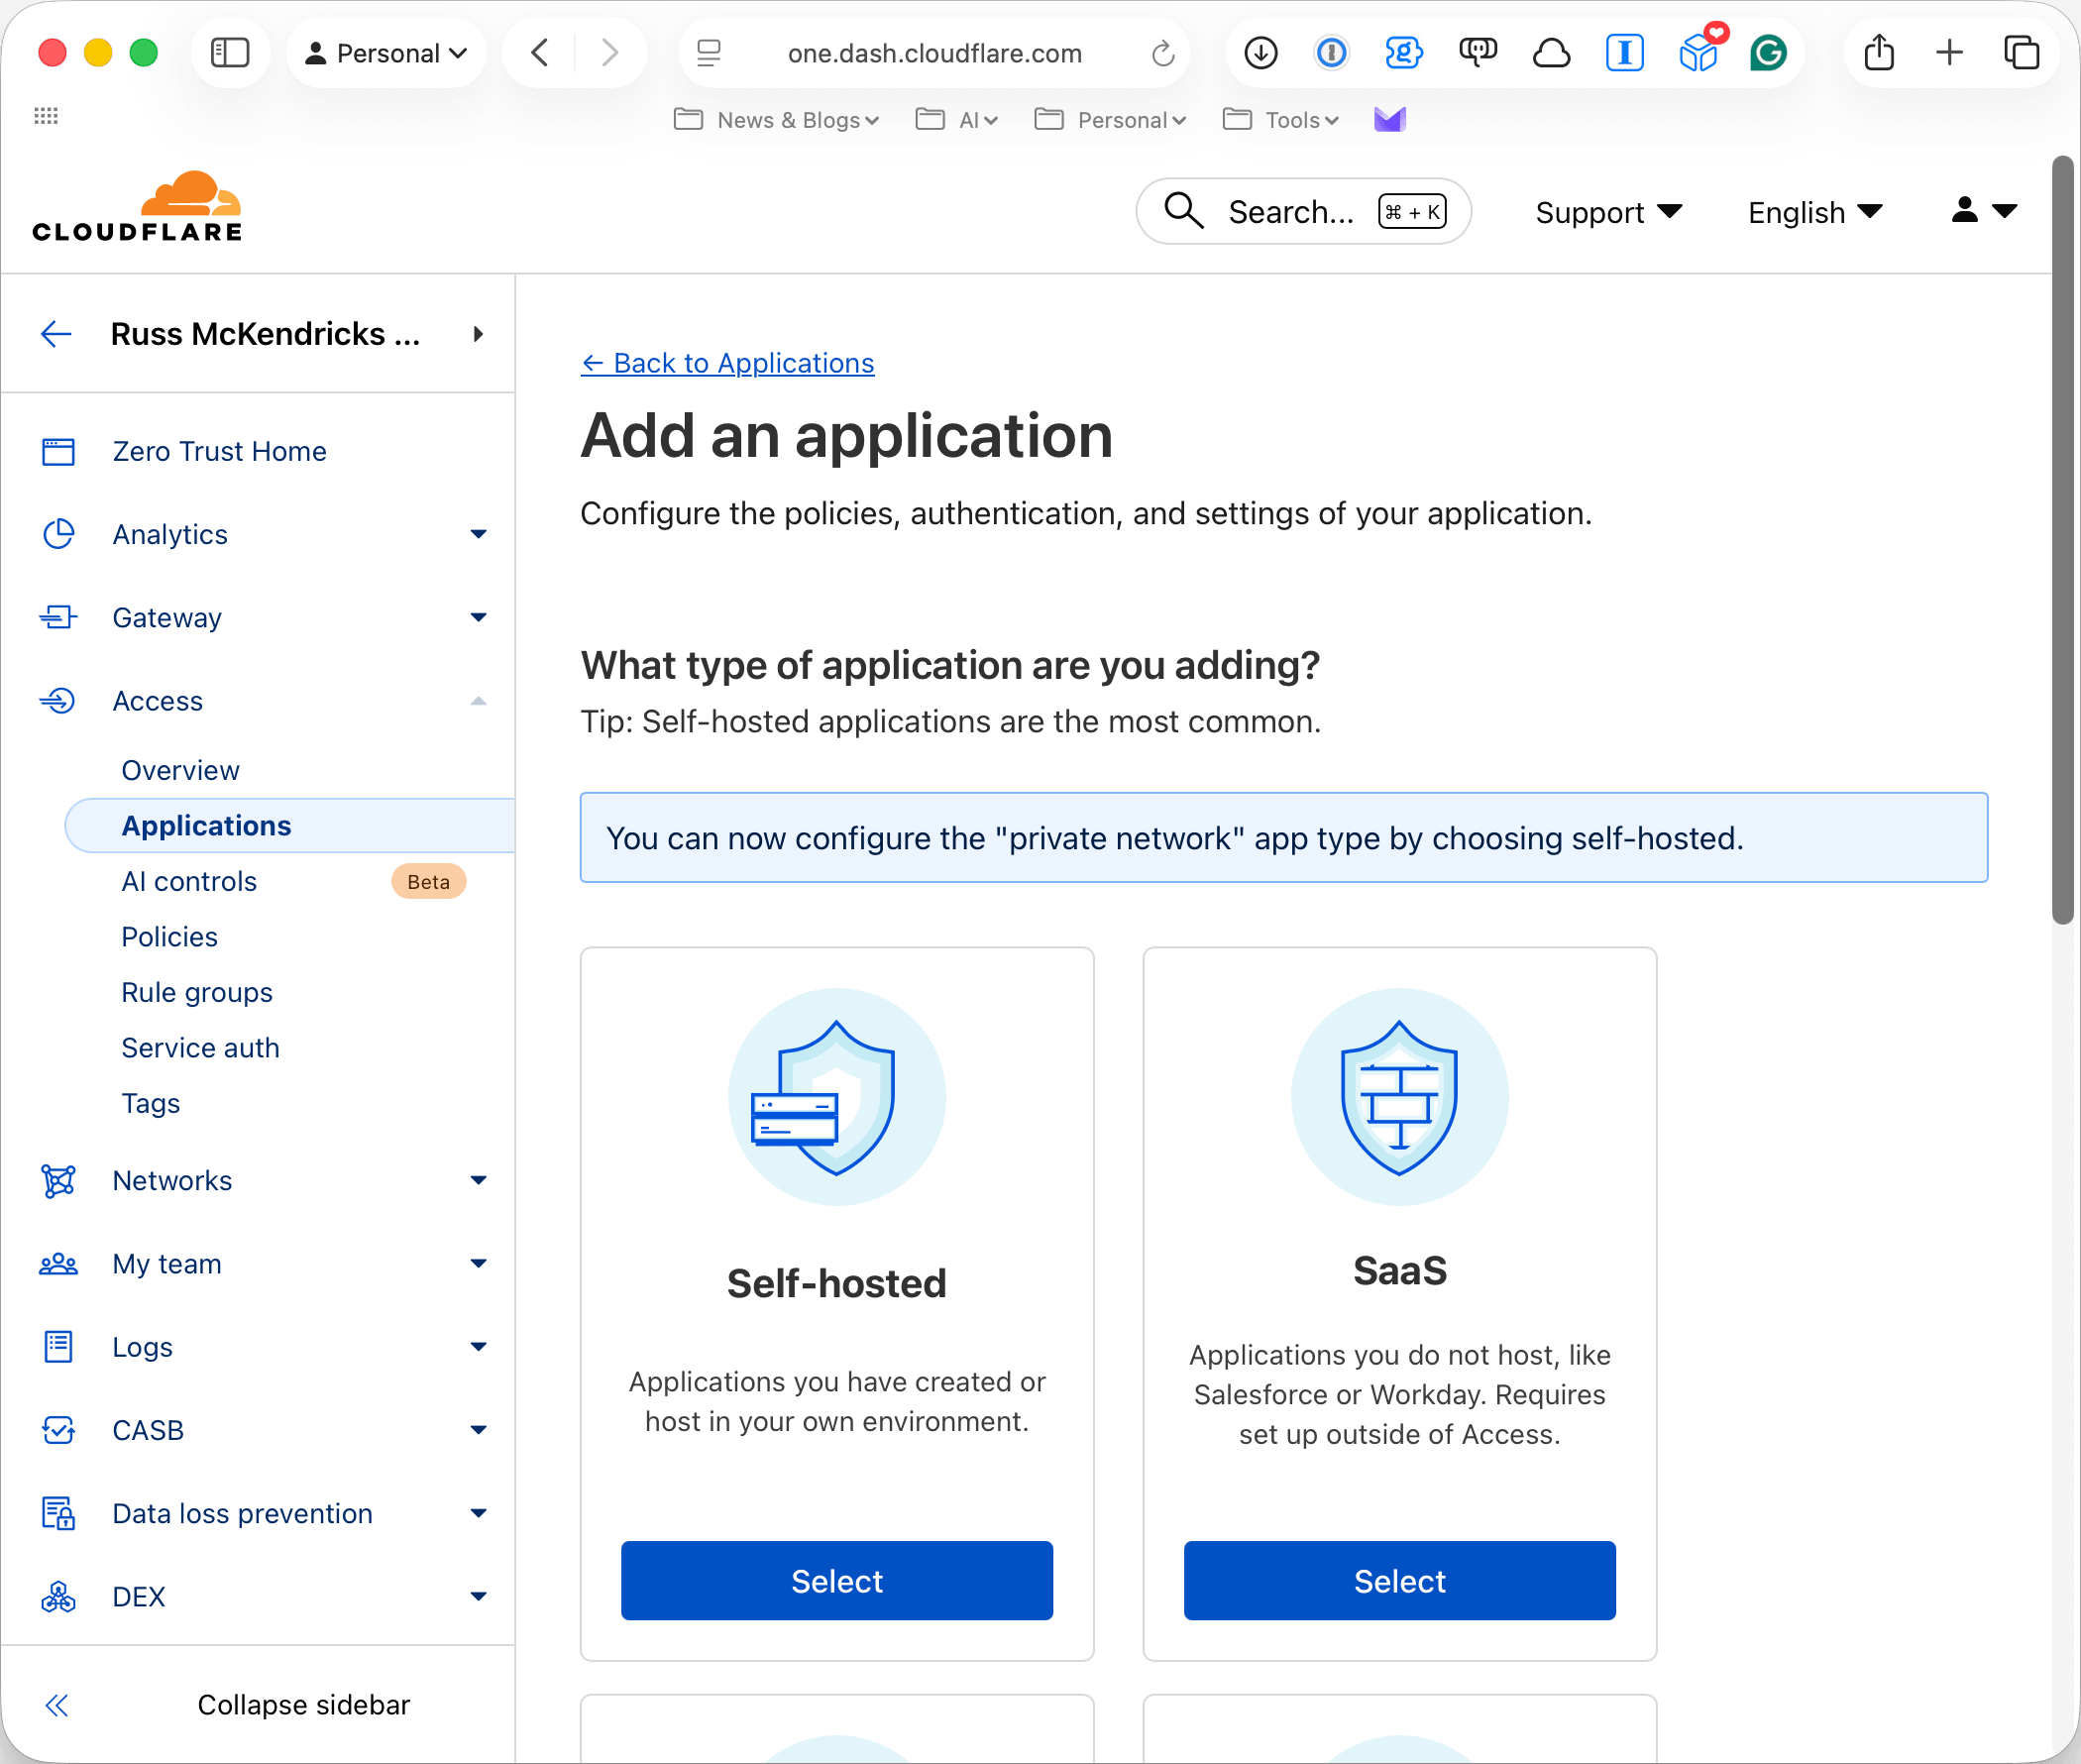 Next give your application a name, in the screens below I have called mine **n8nBlogPost**, then in the public hostname section enter the URL of your n8n instance, in the screens below I have entered **n8n.wibble.foo**:
 Now we need to add a policy to the application, click on **+ Create new policy** where you will be taken to the **Add policy** screen, here enter a name for the policy, I have called mine **n8nBlogPostPolicy**. Then scroll down to the **Add rules** section, by default there will an Include rule waiting to be added, in the **Selector** select **Emails ending in** and enter the domain name of your email provider, in my example I have entered **wibble.email**. Now click on **+ Add require**, in the **Selector** this time select **Country** and enter the country(s) you want to allow access from, in my example I have entered **United Kingdom** and click on **Next**.
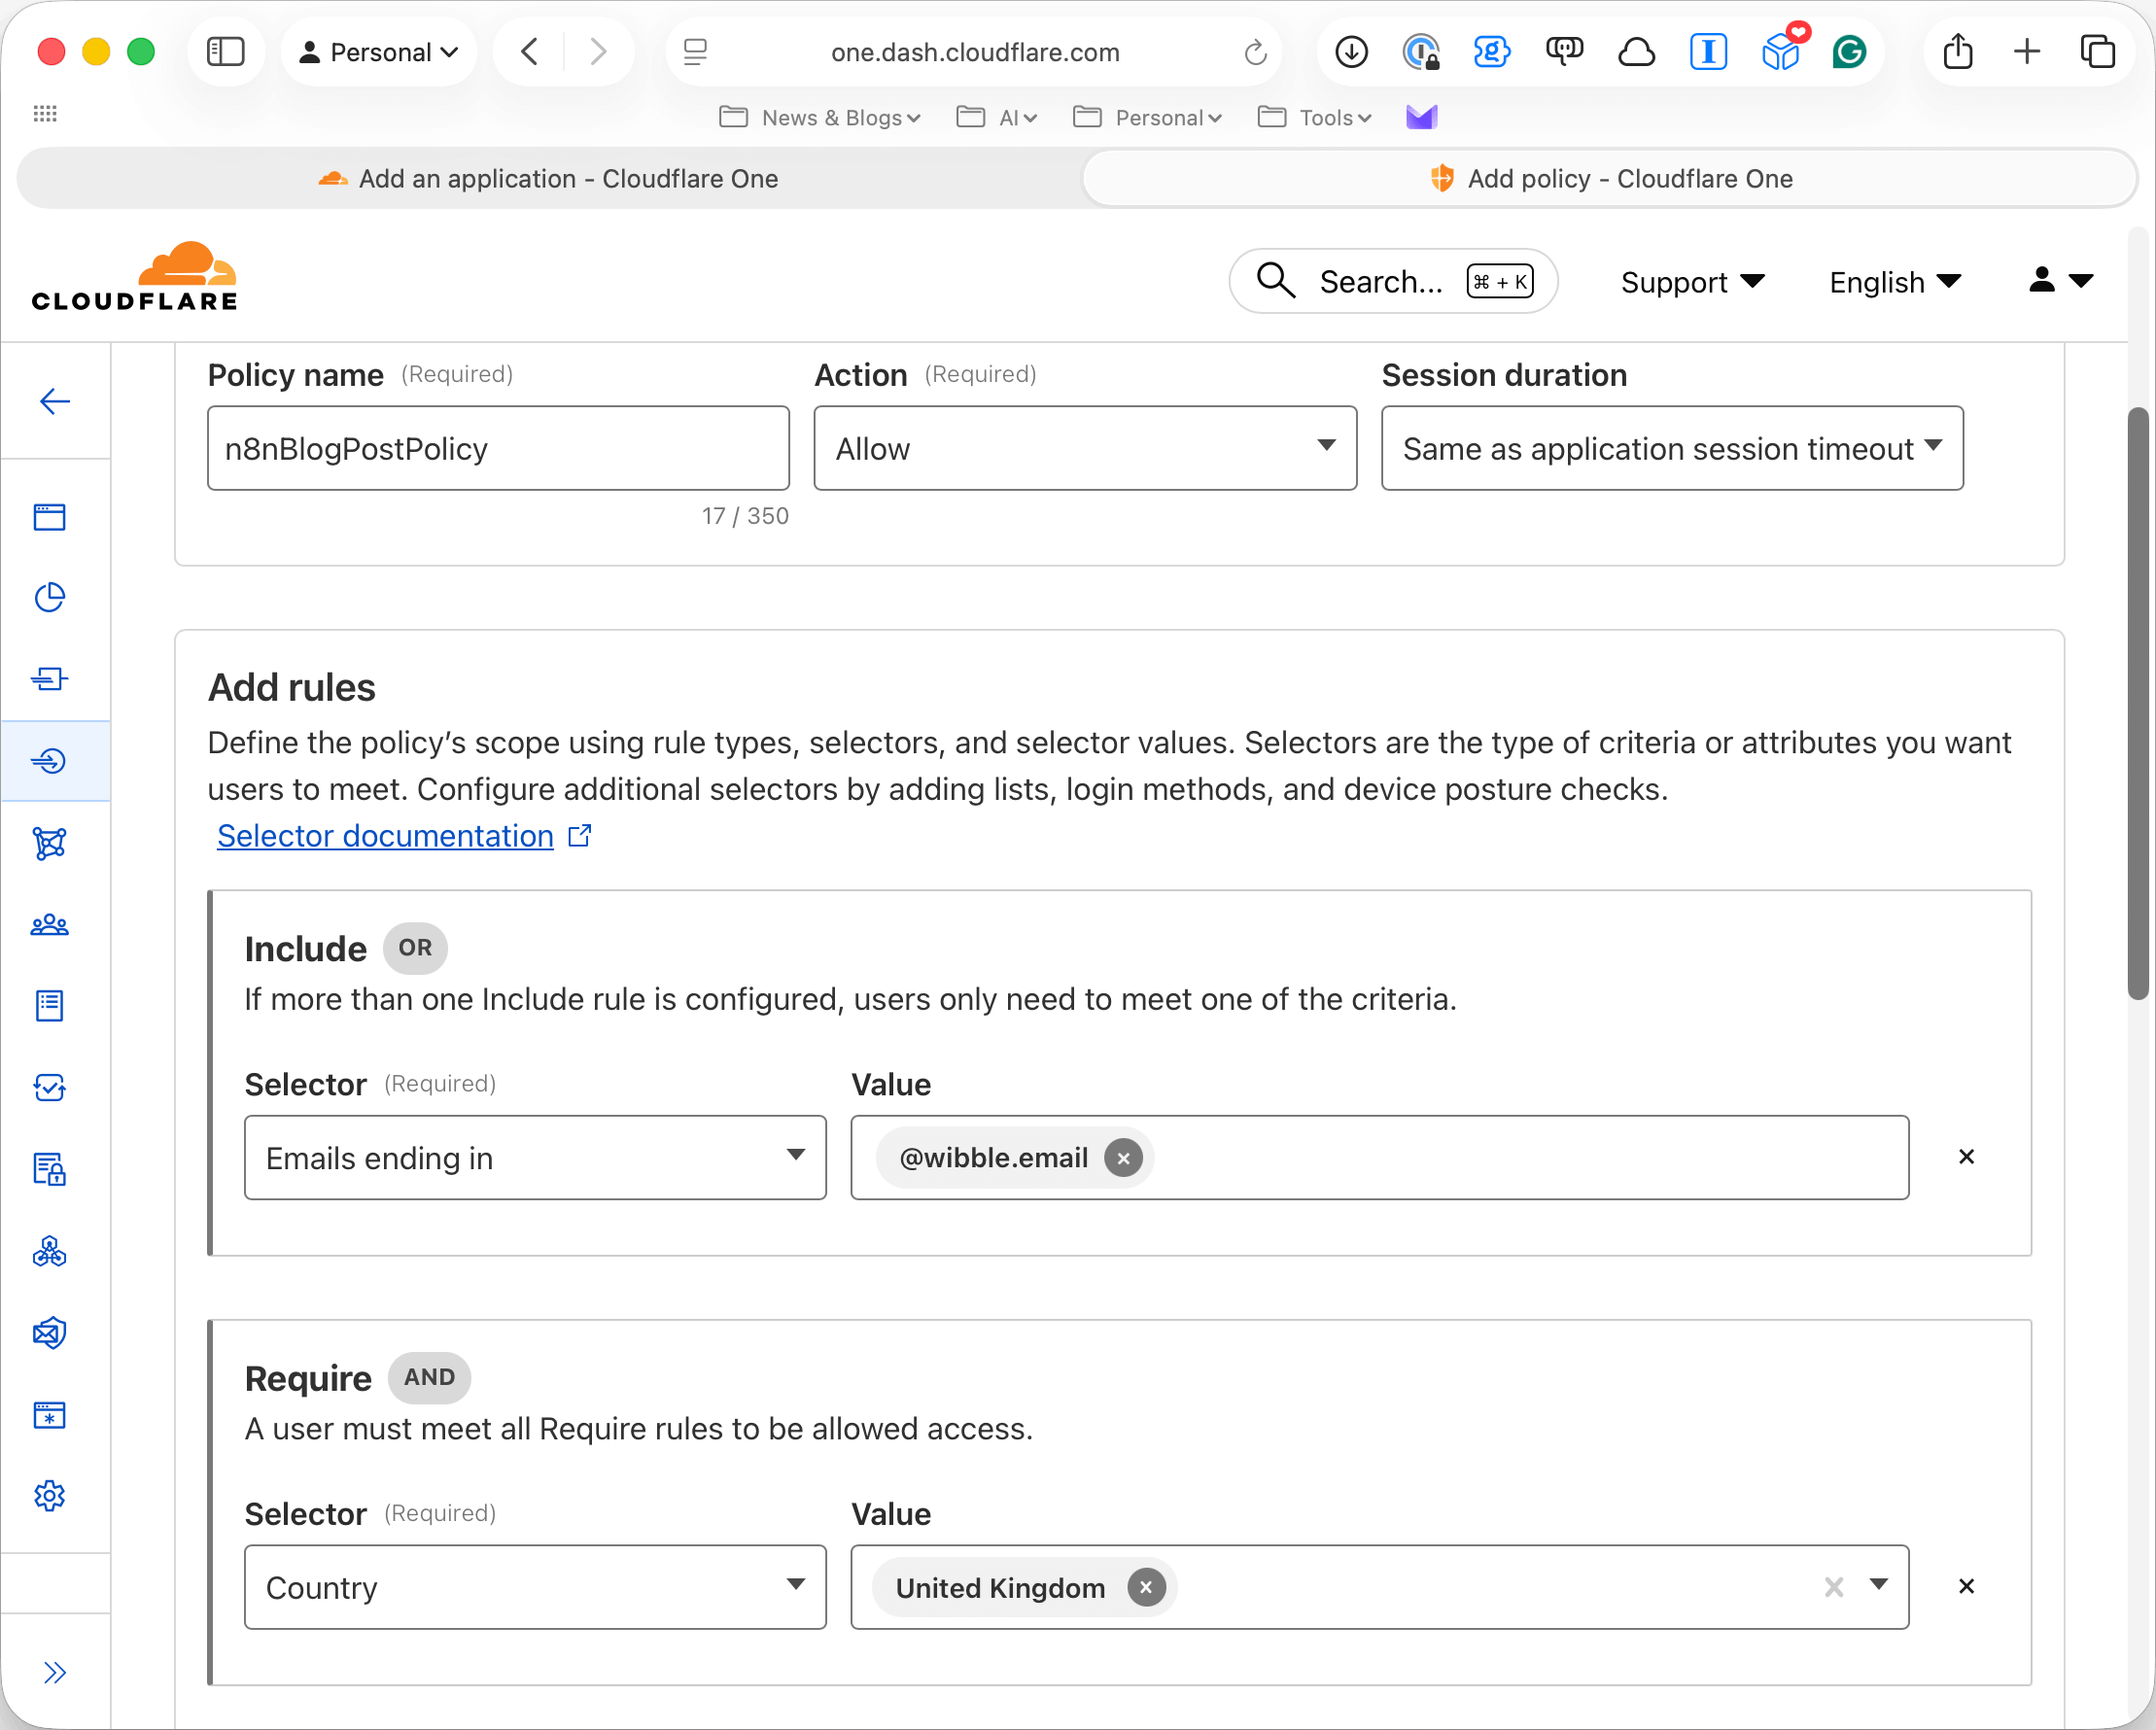 This will create a policy that will allow access to the n8n instance from the United Kingdom for users with an email ending in **wibble.email**. Click on **Save** and return to the tab where you are configuring the application, here click on **Select existing policy** and select the policy you just created.
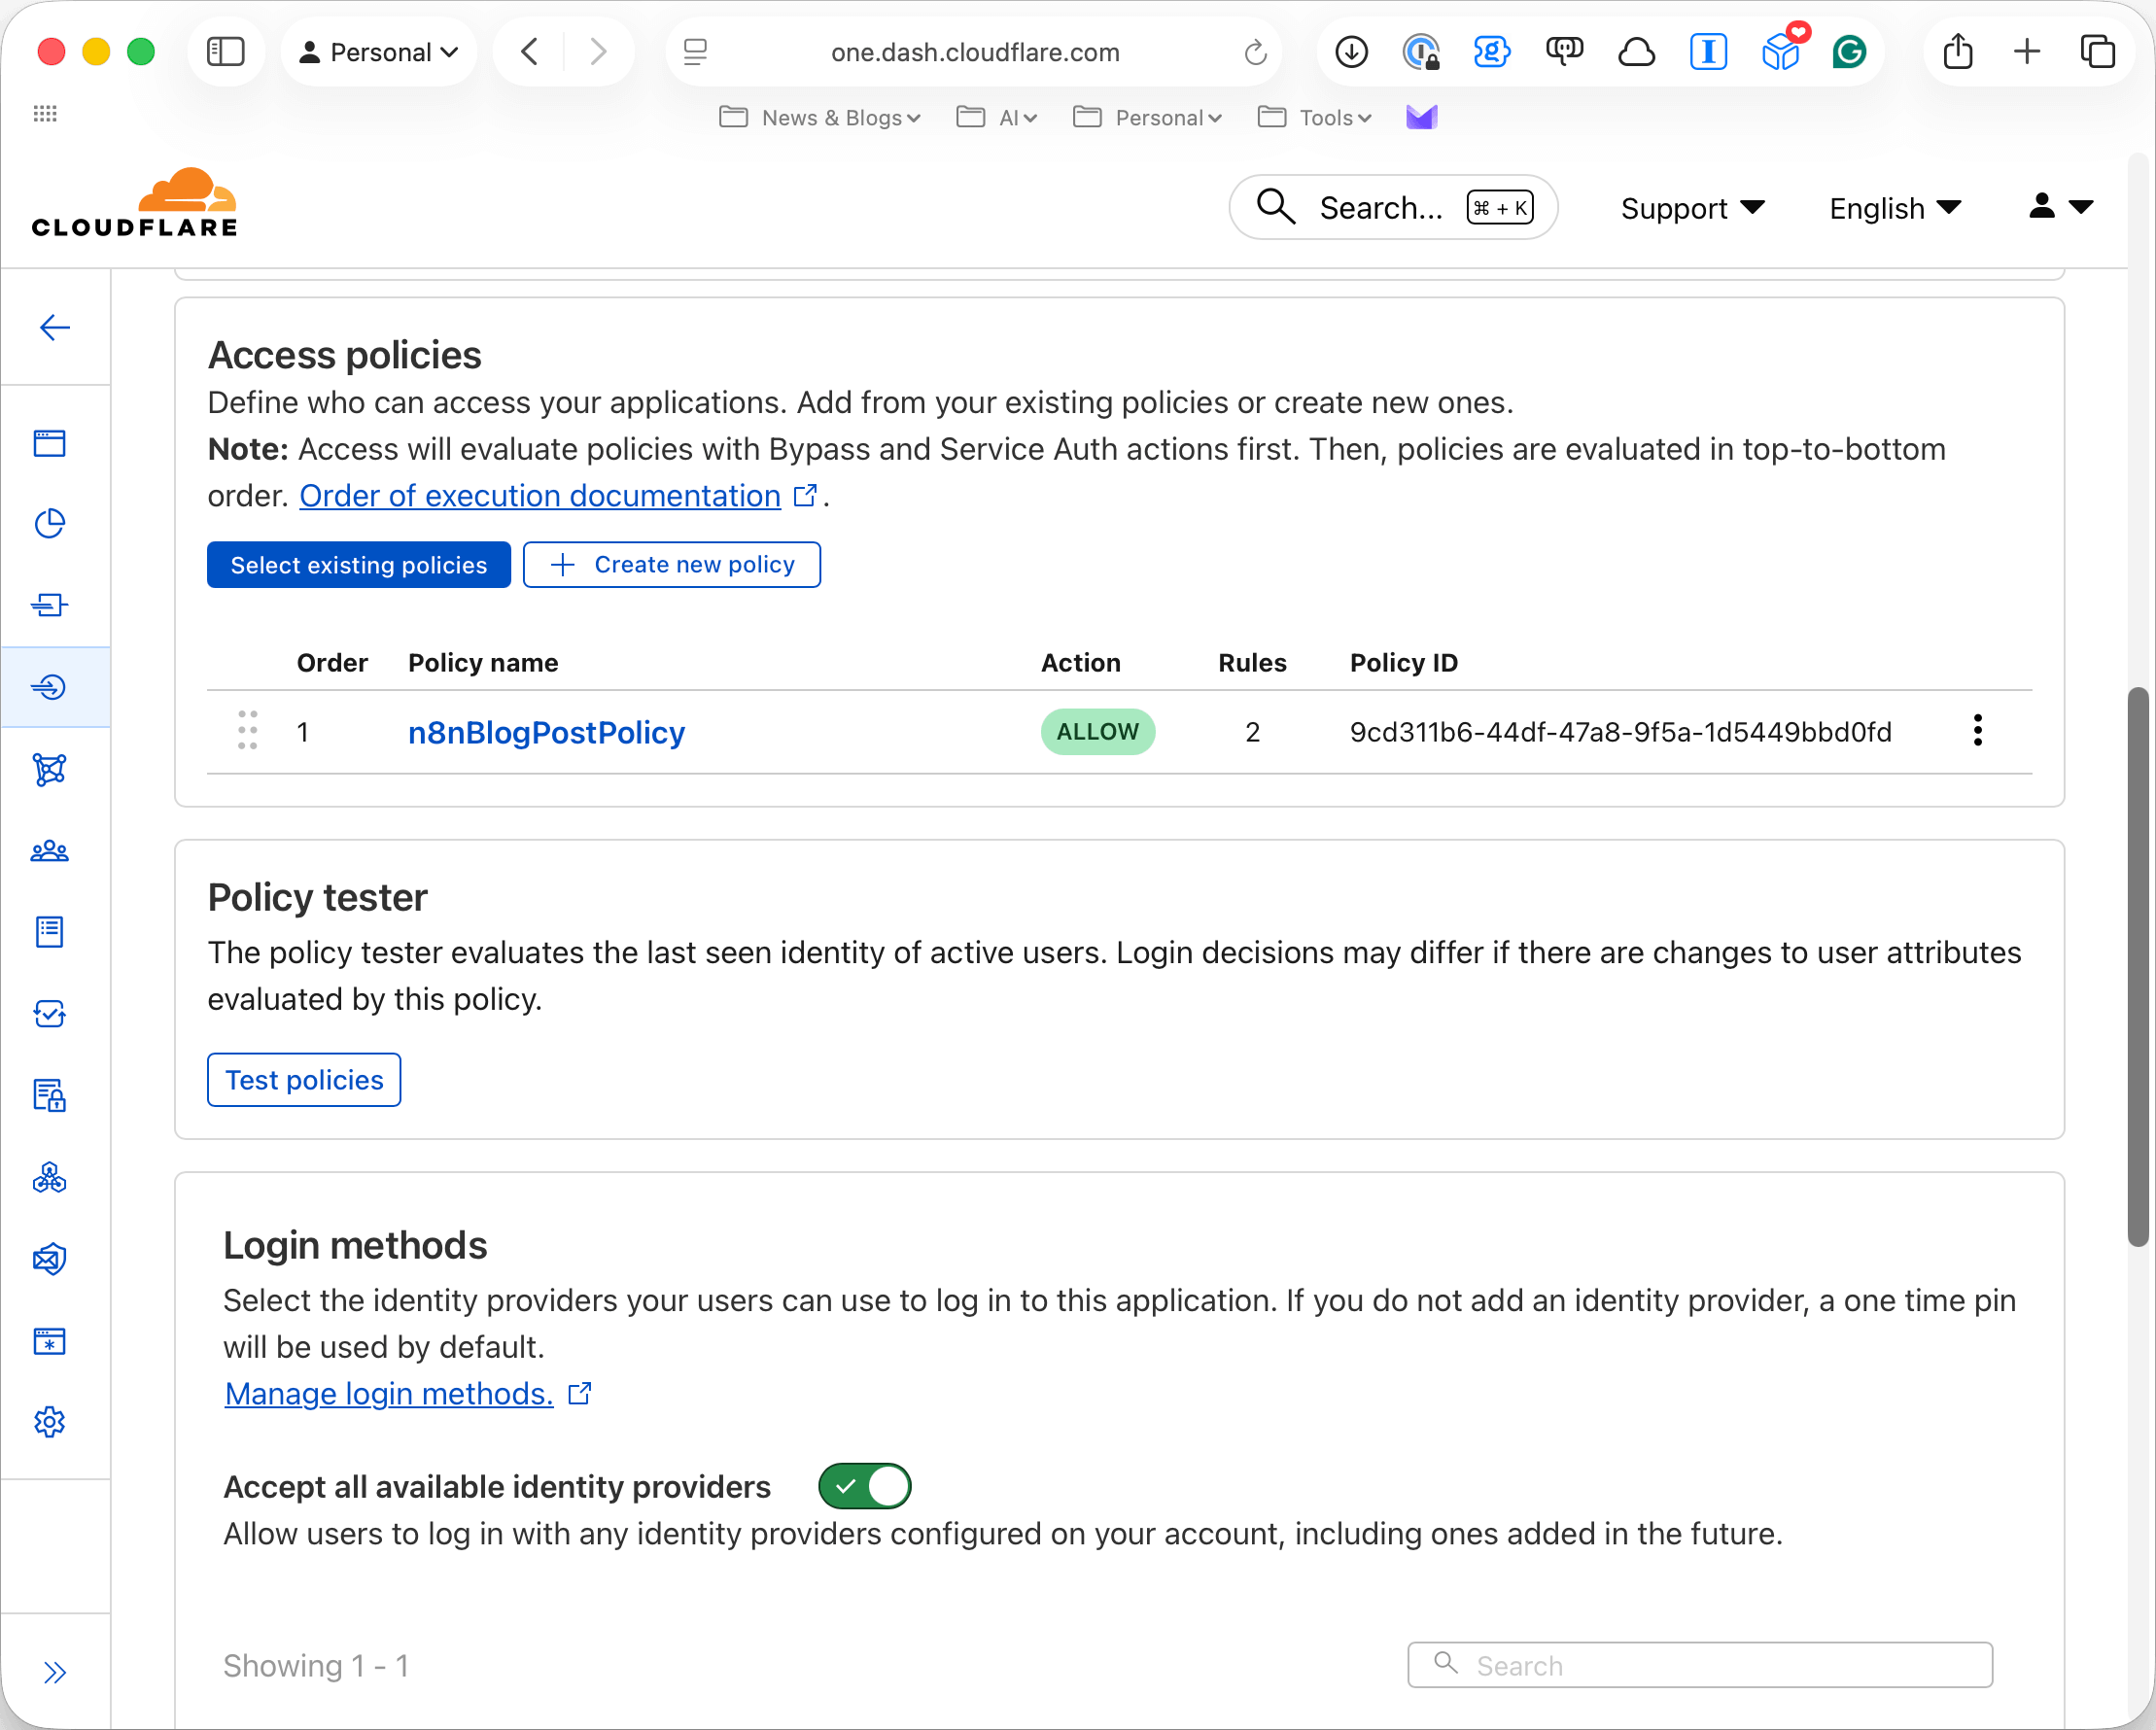 Under **Login methods** select **Accept all available identity providers** and click on **Next**. The next two screens are both optional and can be left at their defaults. Finally, click on **Save** and you will be taken to the **Application** screen where you will see your new application listed.
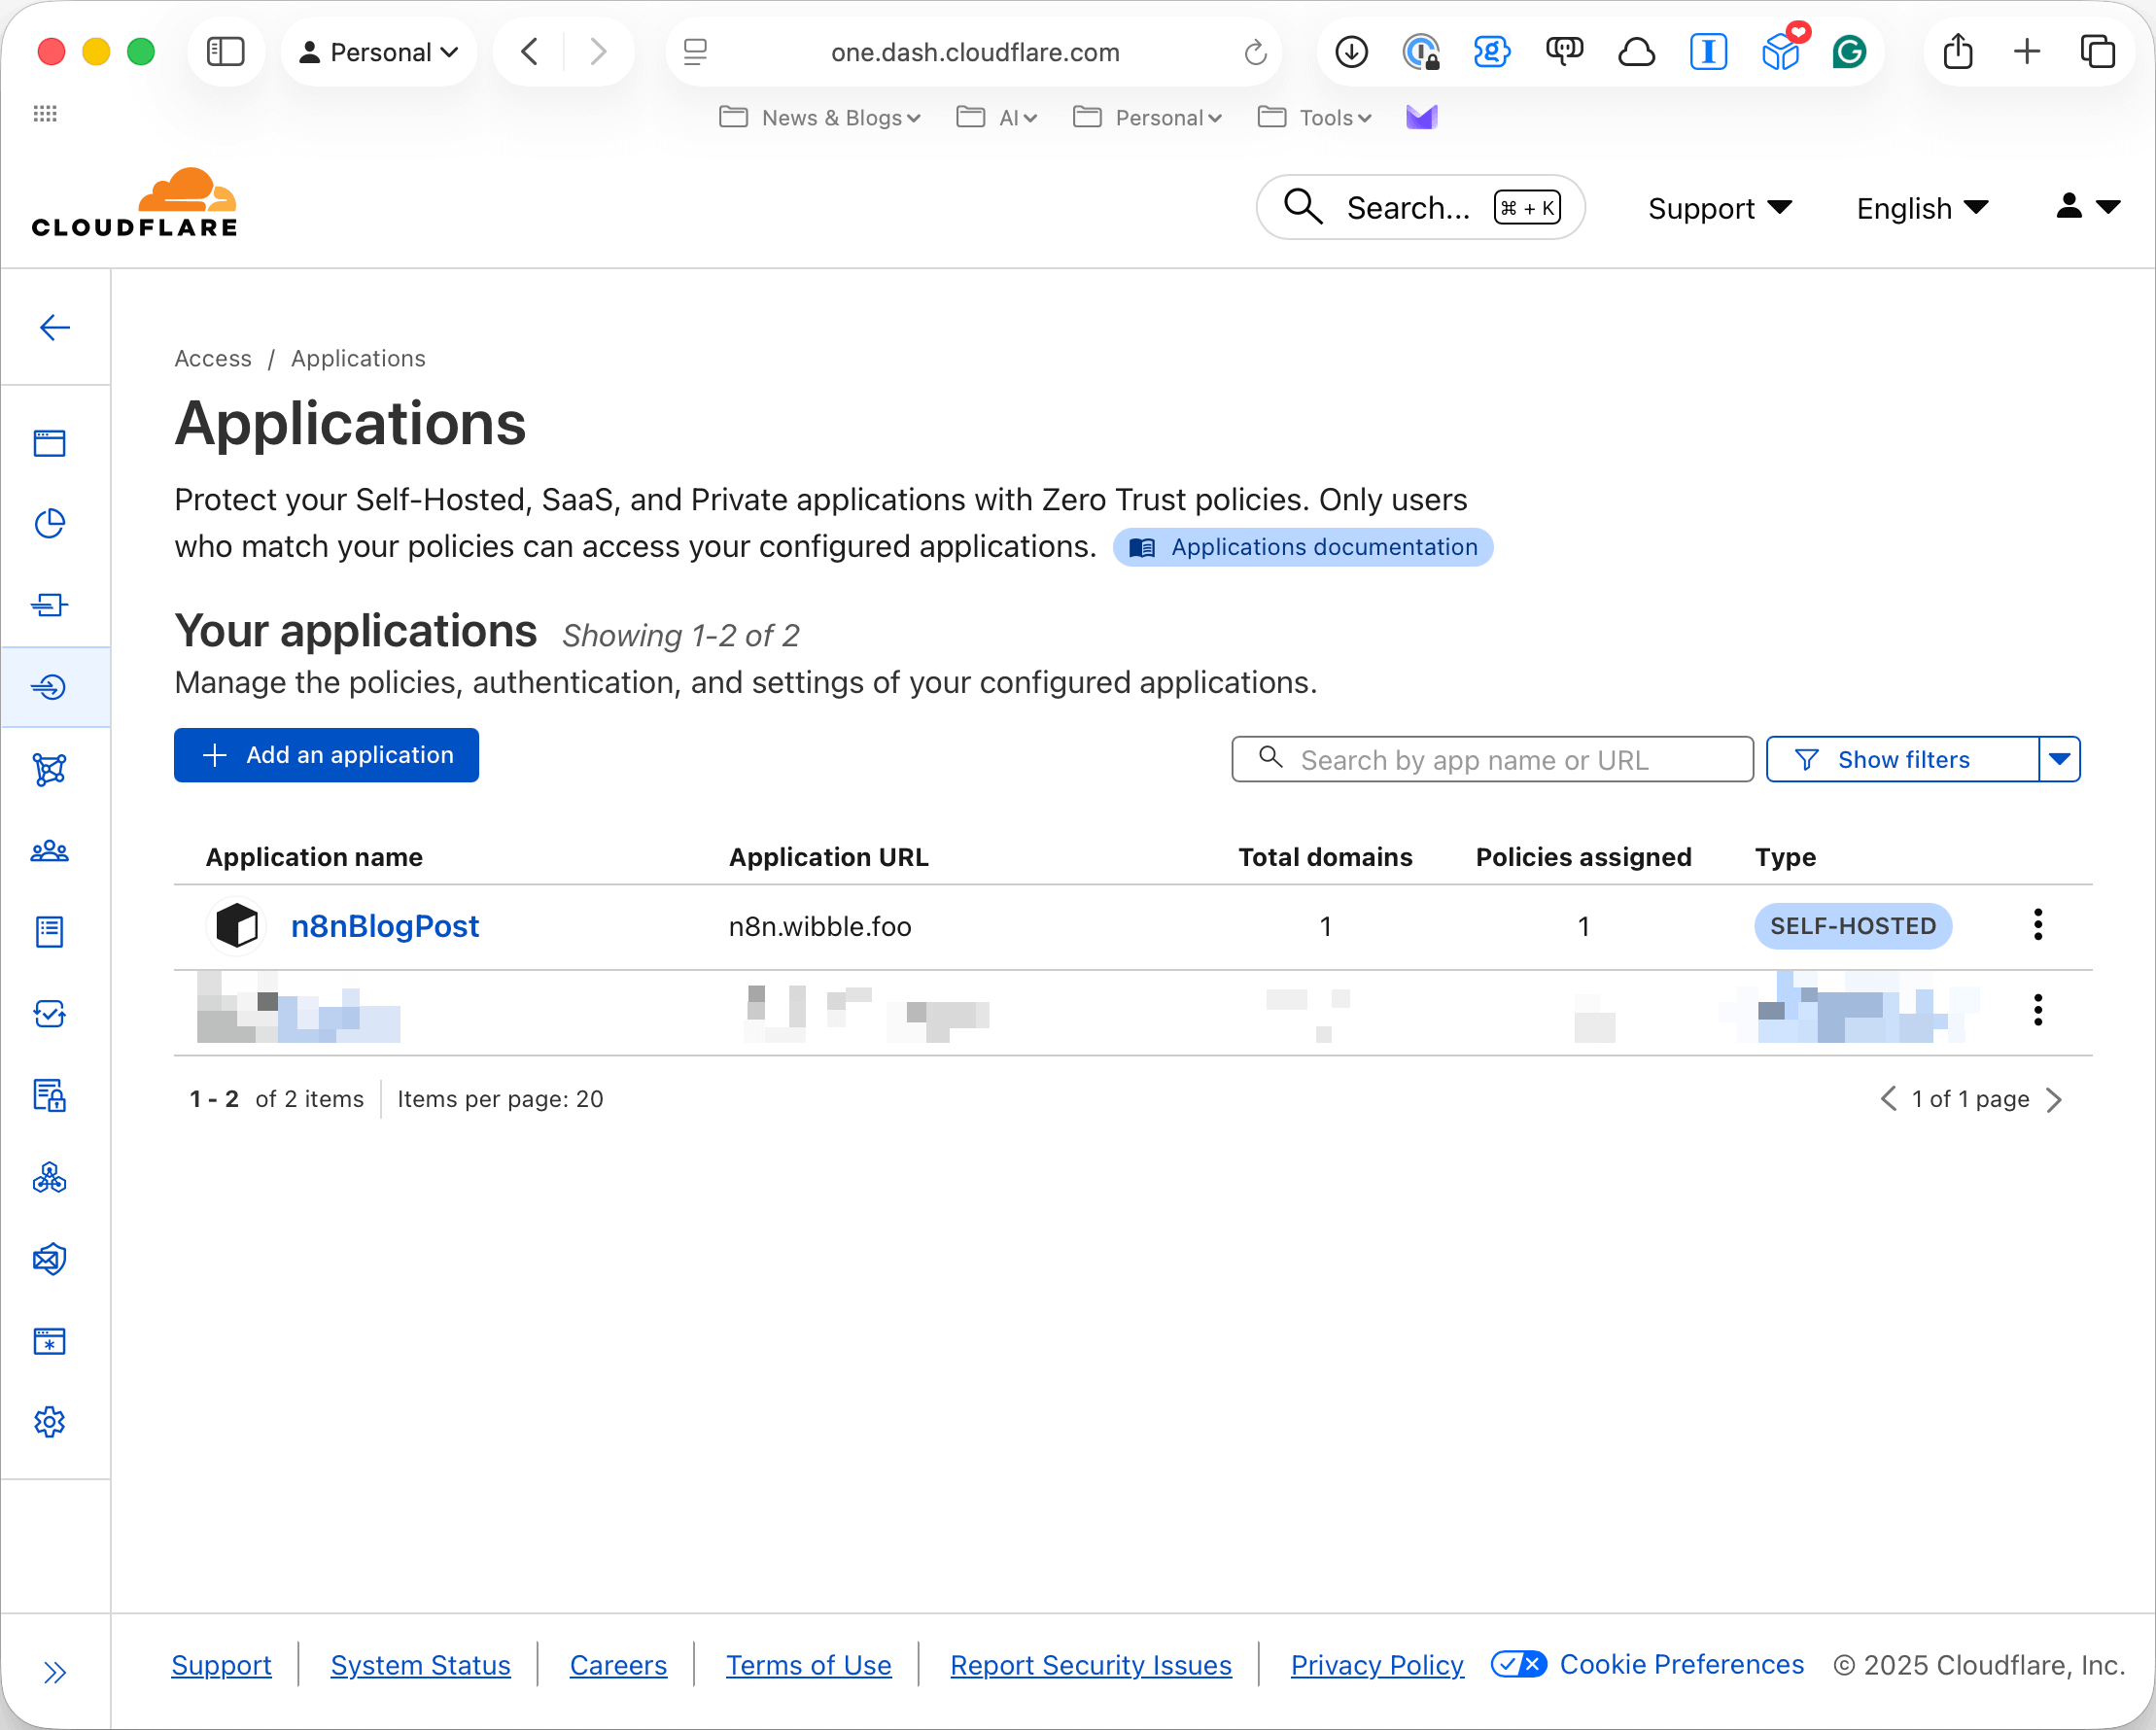 Once configured and goto your n8n domain you should be prompted to login with Cloudflare, once you have done this you will be taken to the n8n editor:
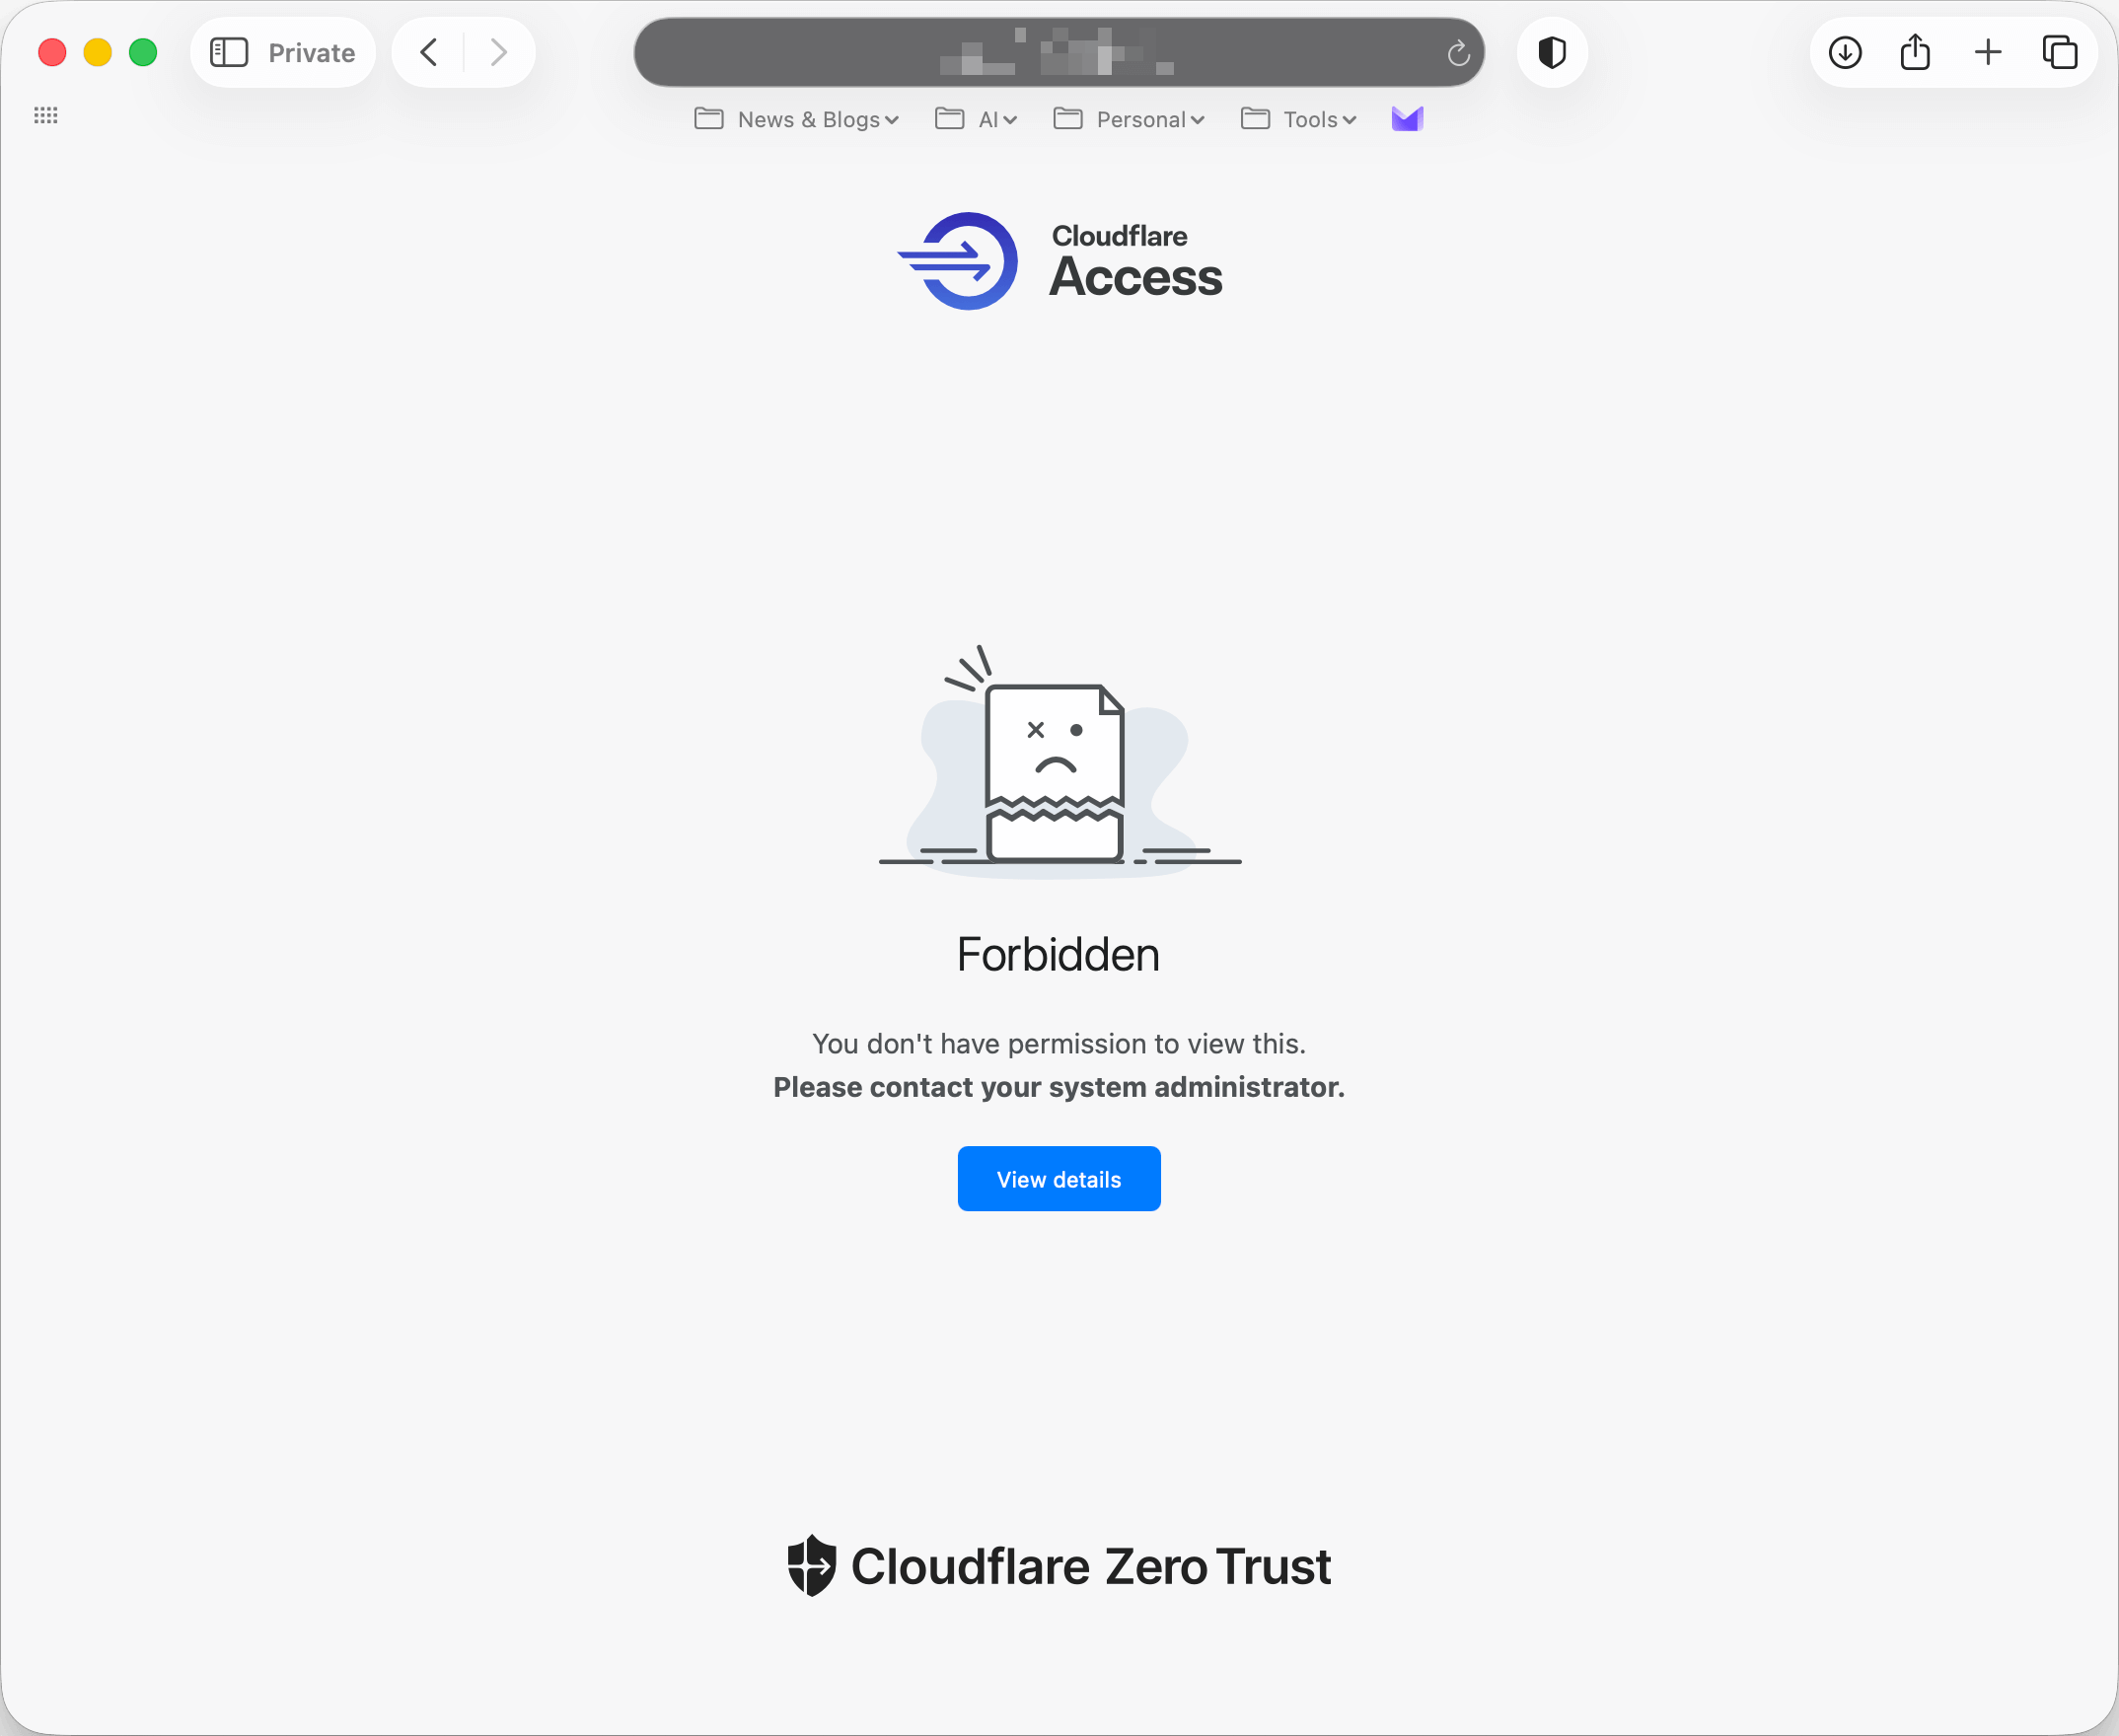 Same for not using the correct email ending in **wibble.email**. The advantage of this is that unless you meet the criteria you will not be able to access the n8n instance; which means no traffic to your local machine from random people or bots on the internet.
## Summary
In this post, we explored how to install n8n on a local resource using Docker and route it via Cloudflare. We saw how easy it is to setup a local n8n instance and how to use Cloudflare Tunnel to route the traffic to it.
Here are the links to n8n and the repository we downloaded the files from:
Same for not using the correct email ending in **wibble.email**. The advantage of this is that unless you meet the criteria you will not be able to access the n8n instance; which means no traffic to your local machine from random people or bots on the internet.
## Summary
In this post, we explored how to install n8n on a local resource using Docker and route it via Cloudflare. We saw how easy it is to setup a local n8n instance and how to use Cloudflare Tunnel to route the traffic to it.
Here are the links to n8n and the repository we downloaded the files from: